How to Make DaVinci Resolve Run Faster
In a world of high-cost subscription services, Blackmagic’s DaVinci Resolve is a breath of fresh air. In 2011, Blackmagic released both a paid and free version of DaVinci Resolve (with DaVinci Resolve Studio being the paid $295).
Immediately, DaVinci Resolve offered an incredible value, especially given the performance of the program. It quickly became known as one of the best NLEs on the market, up there with the likes of Adobe’s Premiere Pro and Apple’s Final Cut Pro.
While DaVinci Resolve was mostly synonymous with a color grading program at first, DaVinci quickly made it an incredibly capable video editing software. As with all video editing software, it’s important to get as much performance as possible out of DaVinci Resolve.
While DaVinci runs great on a slew of Mac, Windows, and Linux devices, there’s never such thing as too fast in the world of post-production. Anything that can be done to speed up performance and make DaVinci Resolve run faster is a blessing.
Small tips and tricks such as these are essential when editing content for the sake of efficiency. The more time saved as a video editor the better. That’s why third-party extensions and plugins are so important in DaVinci Resolve and other NLEs. Software like Simon Says is such a timesaver for both professionals and beginners.
You can use Simon Says to transcribe and caption natively within Resolve (and in 100 languages). The extension is not resource intensive so it won't slow down Resolve's performance.
Ways to improve DaVinci Resolve performance
The great thing about DaVinci Resolve is how customizable it is. There are so many ways to get great performance out of the software. This is essential when working with high-quality video files or clips with a ton of effects. Even simple things such as quickly being able to scrub through your timeline can make a huge difference when it comes to workflow.
1. Check system requirements
While DaVinci Resolve is incredibly well-optimized, some systems just aren’t powerful enough for the program. For Mac users running DaVinci Resolve 17 and 18, it’s recommended that you have:
- macOS 11 Big Sur
- 8 GB of system memory (16 GB for intense graphics work)
- M1 CPU (or intel core i7 on older macs)
- 2 GB VRAM Graphics Card
- A fast SSD
For Windows users, it’s recommended that you have:
- Windows 10
- 16 GB of system memory (32 GB for intense graphics work)
- Intel core i7 or AMD Ryzen 7 CPU
- 4 GB VRAM Graphics Card
- A fast SSD
Those running Linux will want:
- CentOS 7.3
- 32 GB of system memory
- Intel core i7 or AMD Ryzen 7 CPU
- 4 GB VRAM Graphics Card
- A fast SSD
2. Enable Render Cache
Sometimes, having the recommended requirements isn’t enough though. An easy thing you can do to get a small boost in performance is to enable the render cache in DaVinci. Cache in video editing is simply a temporary file set that allows your NLE to run smoothly. You’ll want to go to Playback > Render cache > Smart.
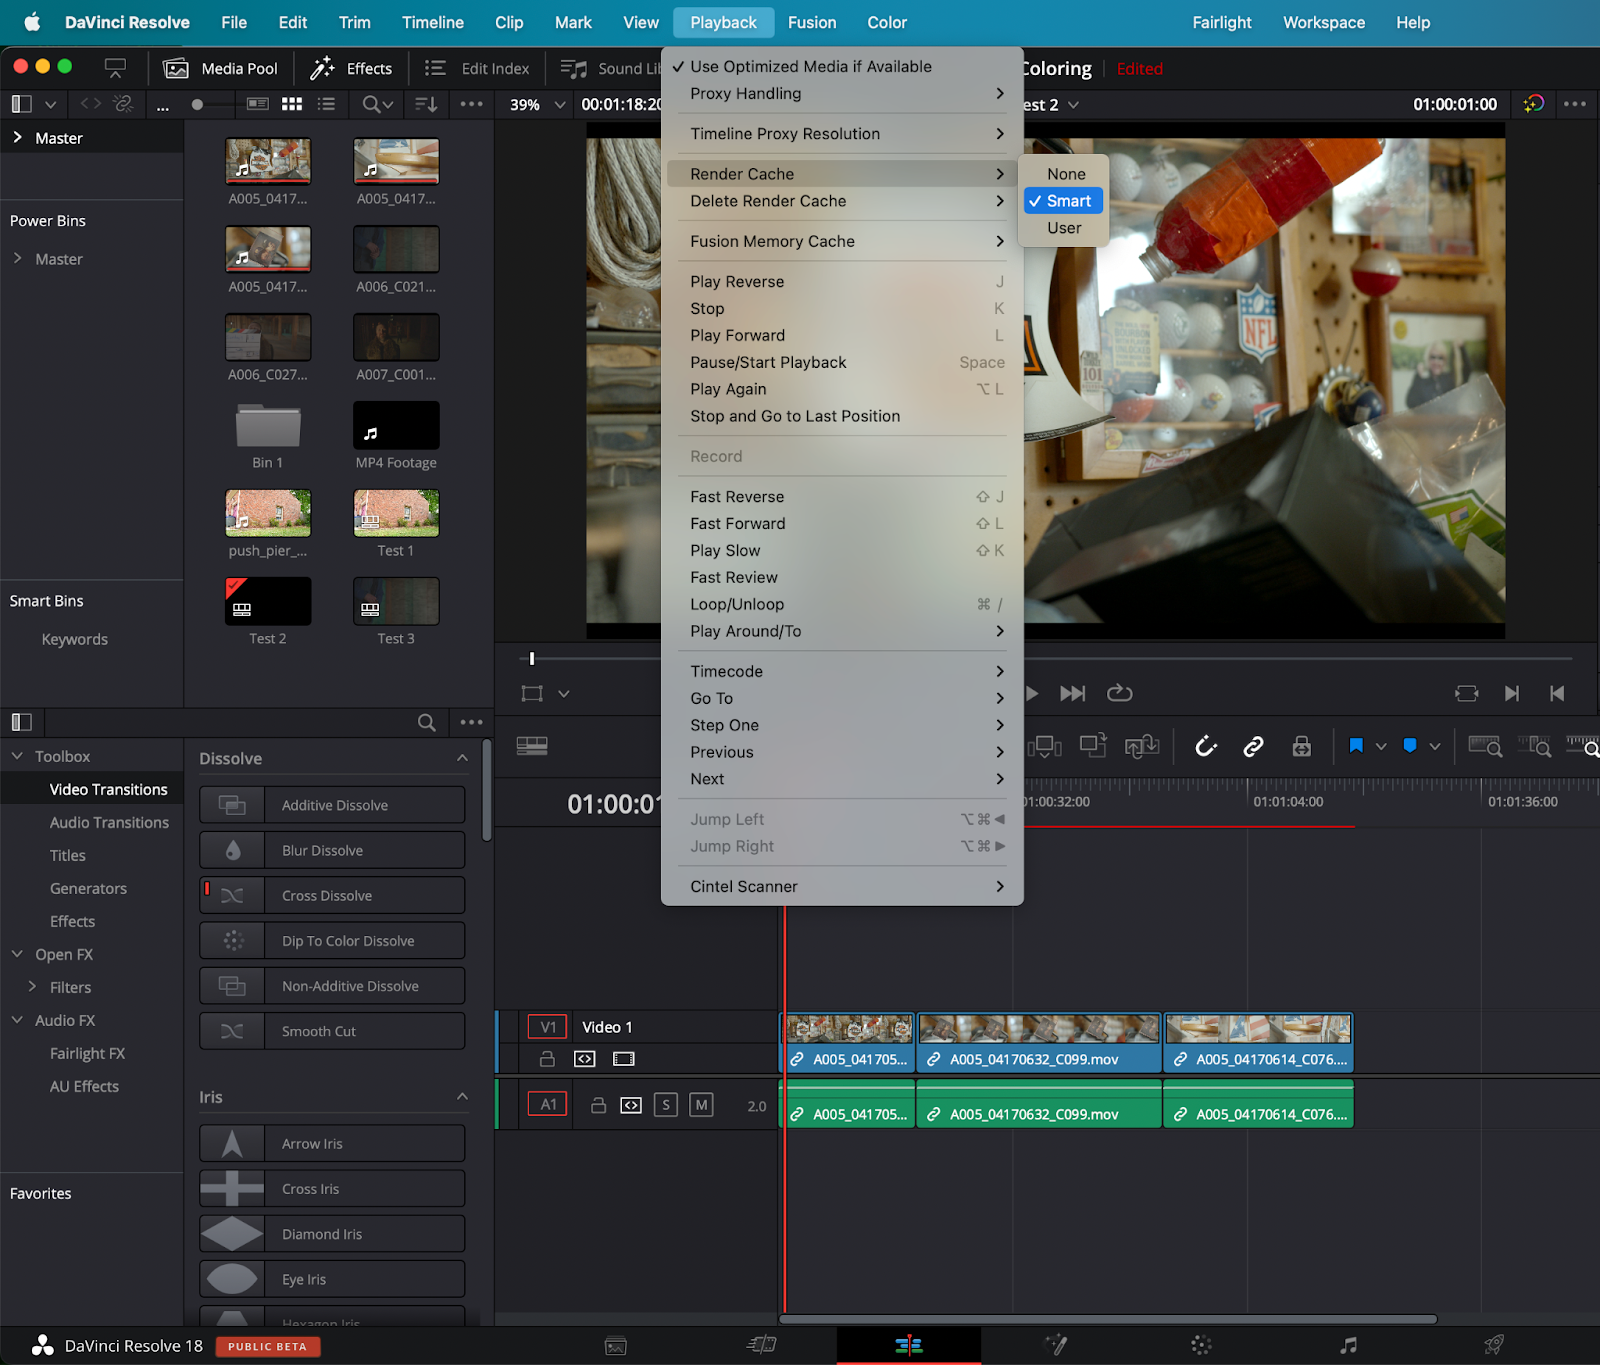
What this does is let DaVinci Resolve choose which video files it wants to throw into the cache automatically. These are often larger files that are heavy in effects. You can tell if clips are in the cache or not by the timeline. A blue line indicates that all clips are in the cache whereas a red line shows that they are not.
Another thing that you can do is right-click on your clip, go to Render Cache fusion output, and select On or Auto. This gives you control over what clips you want to throw into the cache since it will only do so for the clip that you select. Enabling both of these small options leads to great playback performance.

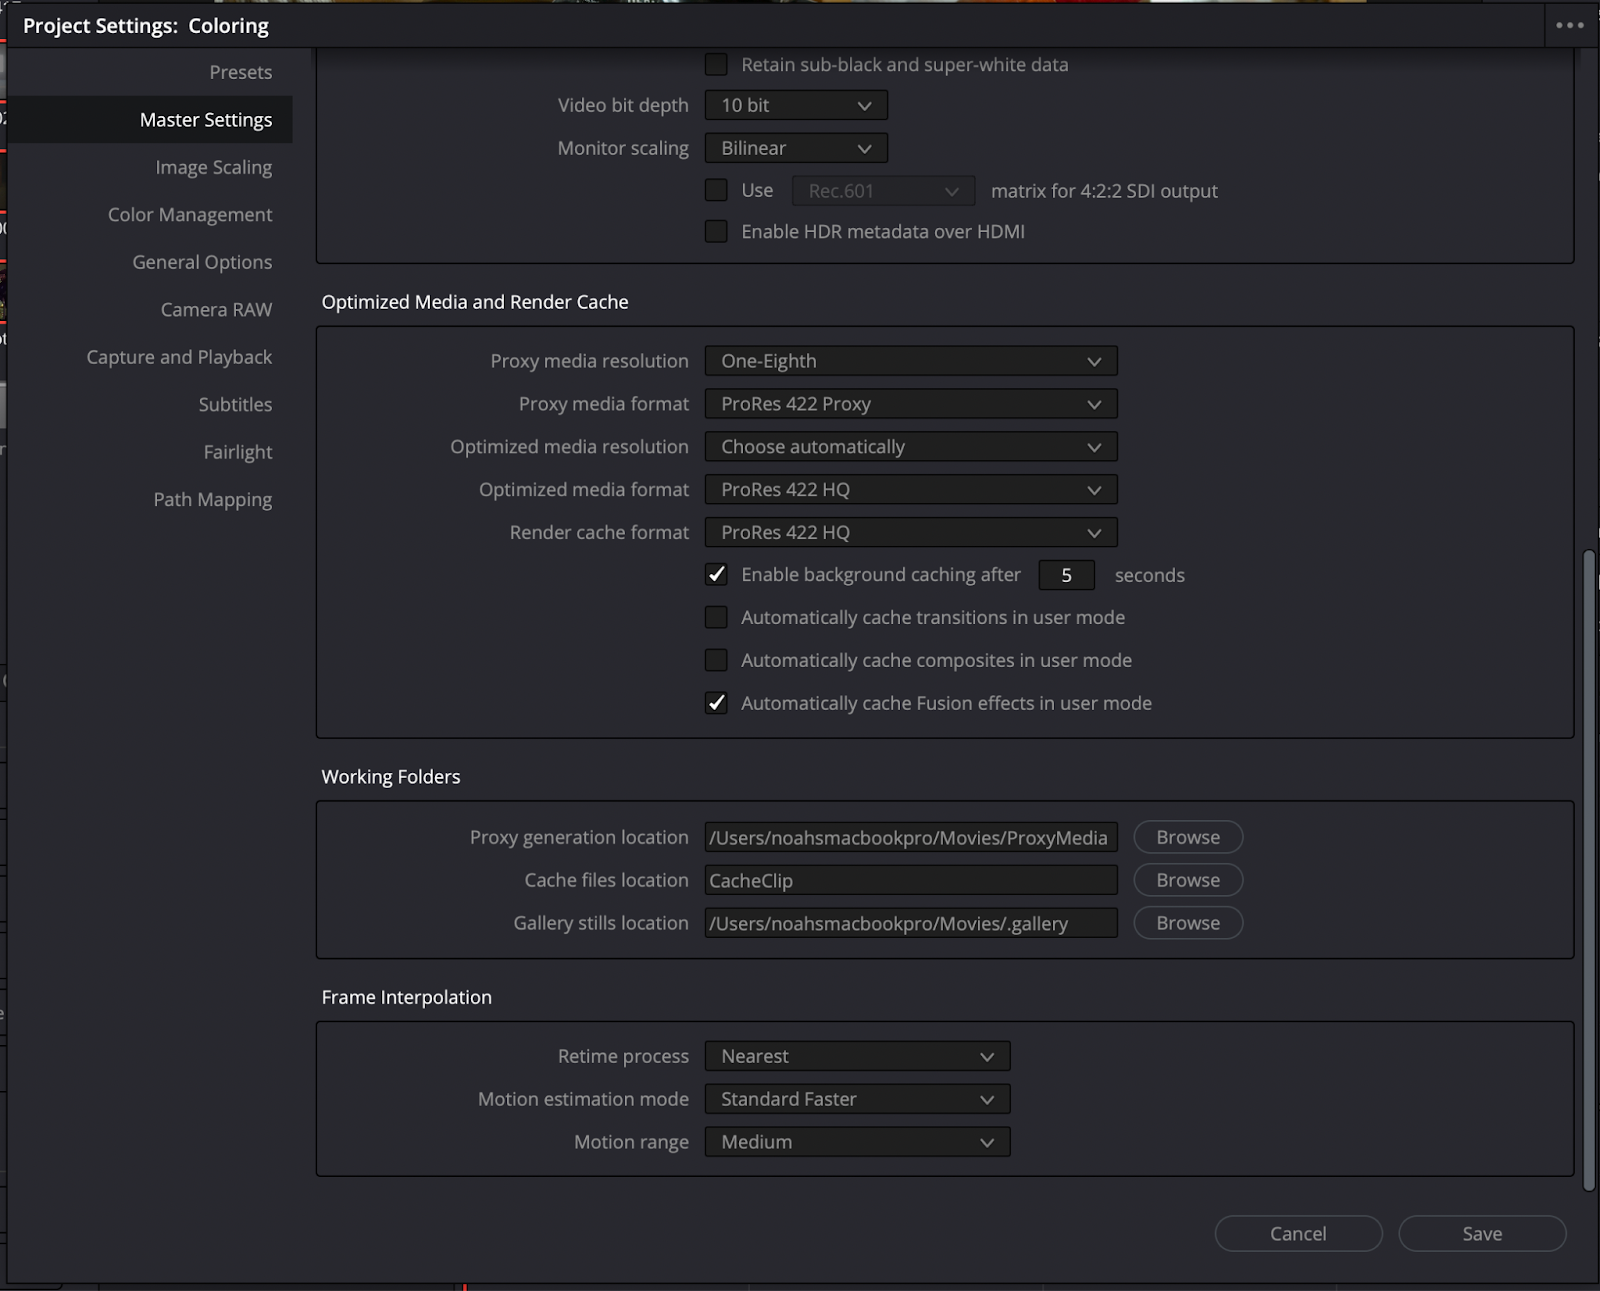
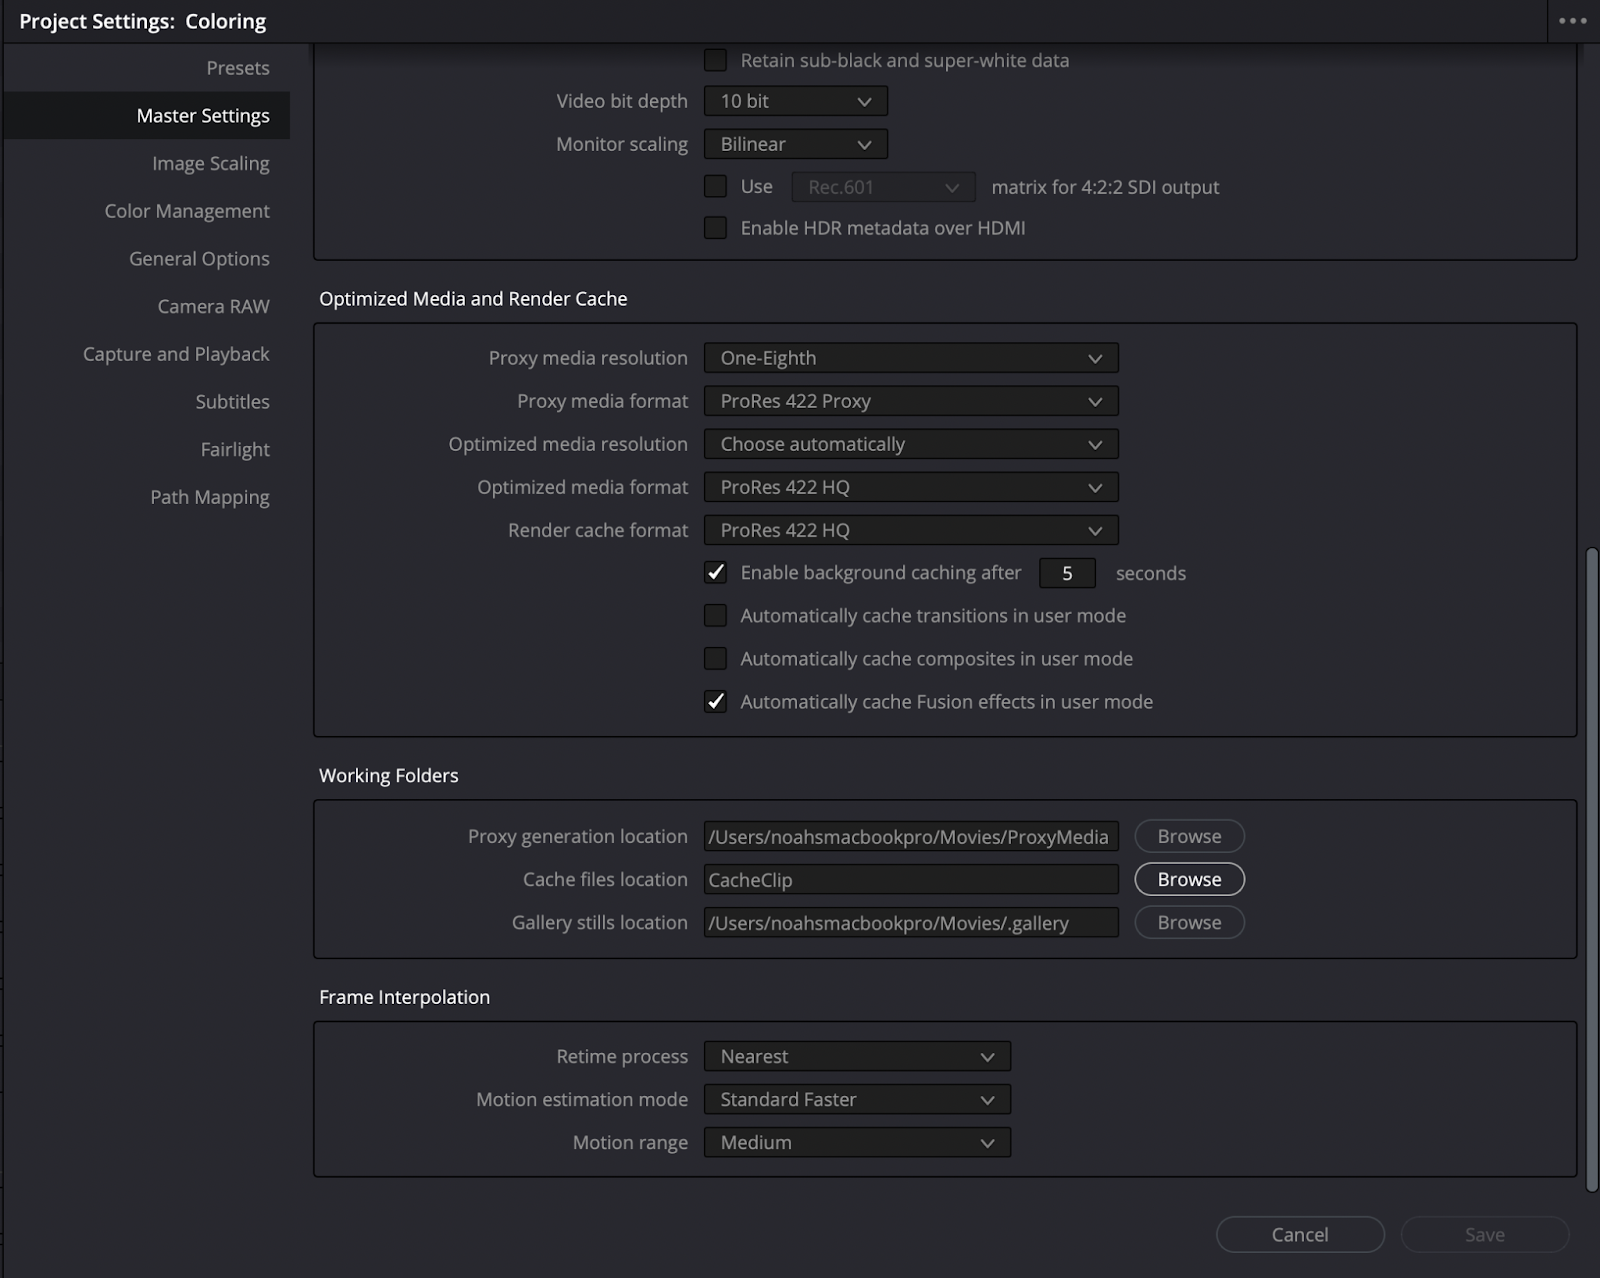
3. Use optimized media
Optimized media clips are essentially pre-rendered duplicates of the video files that you have in your project. This is super handy if you have an underpowered machine. To enable this setting, you’ll want to click on the Project Settings (gear) icon in the lower right-hand corner. You’ll then want to go to master settings and then to Optimized Media Format.
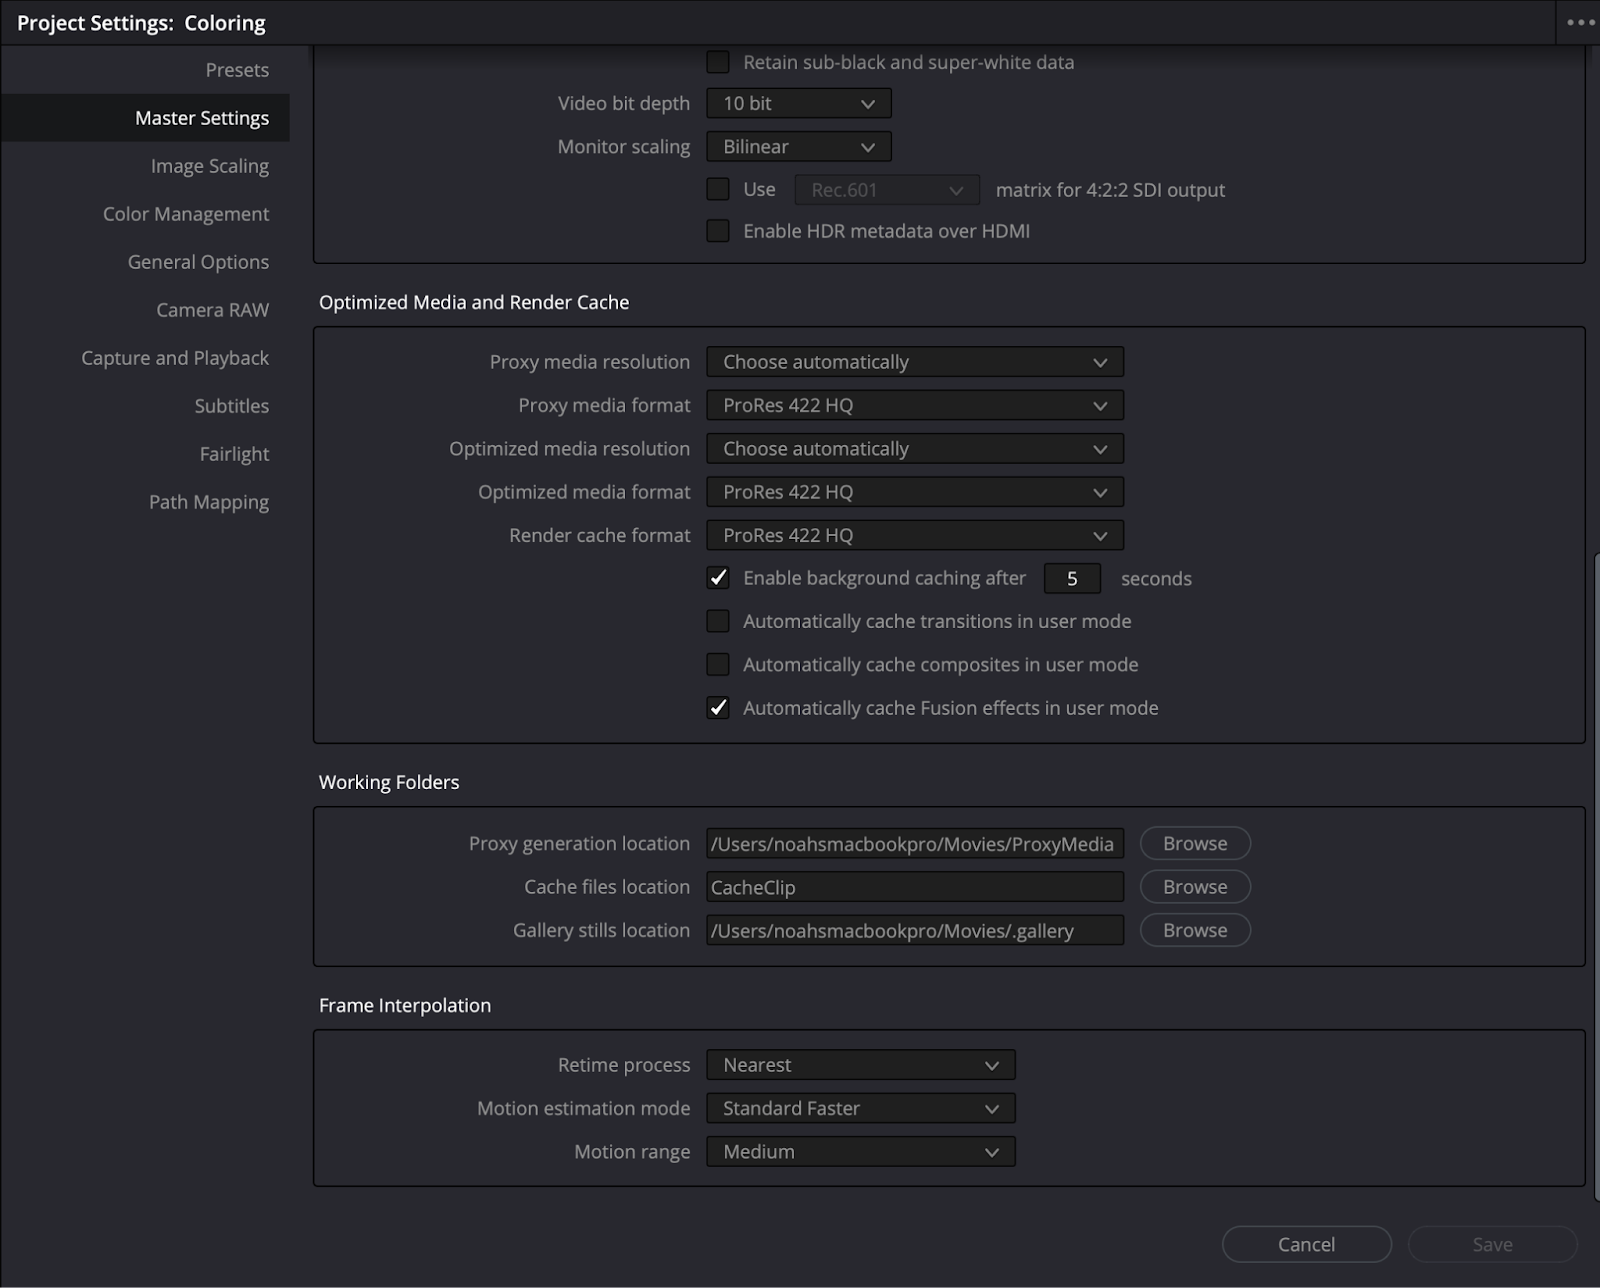
The drop-down menu will give you a whole slew of options. ProRes options will run great on mac whereas DNxHR will work great for Windows devices. You’re still not done here though. You’ll want to go to your media pool and select all of your clips that need an optimized media format. You’ll then want to right-click in the media pool and select Generate Optimized Media.

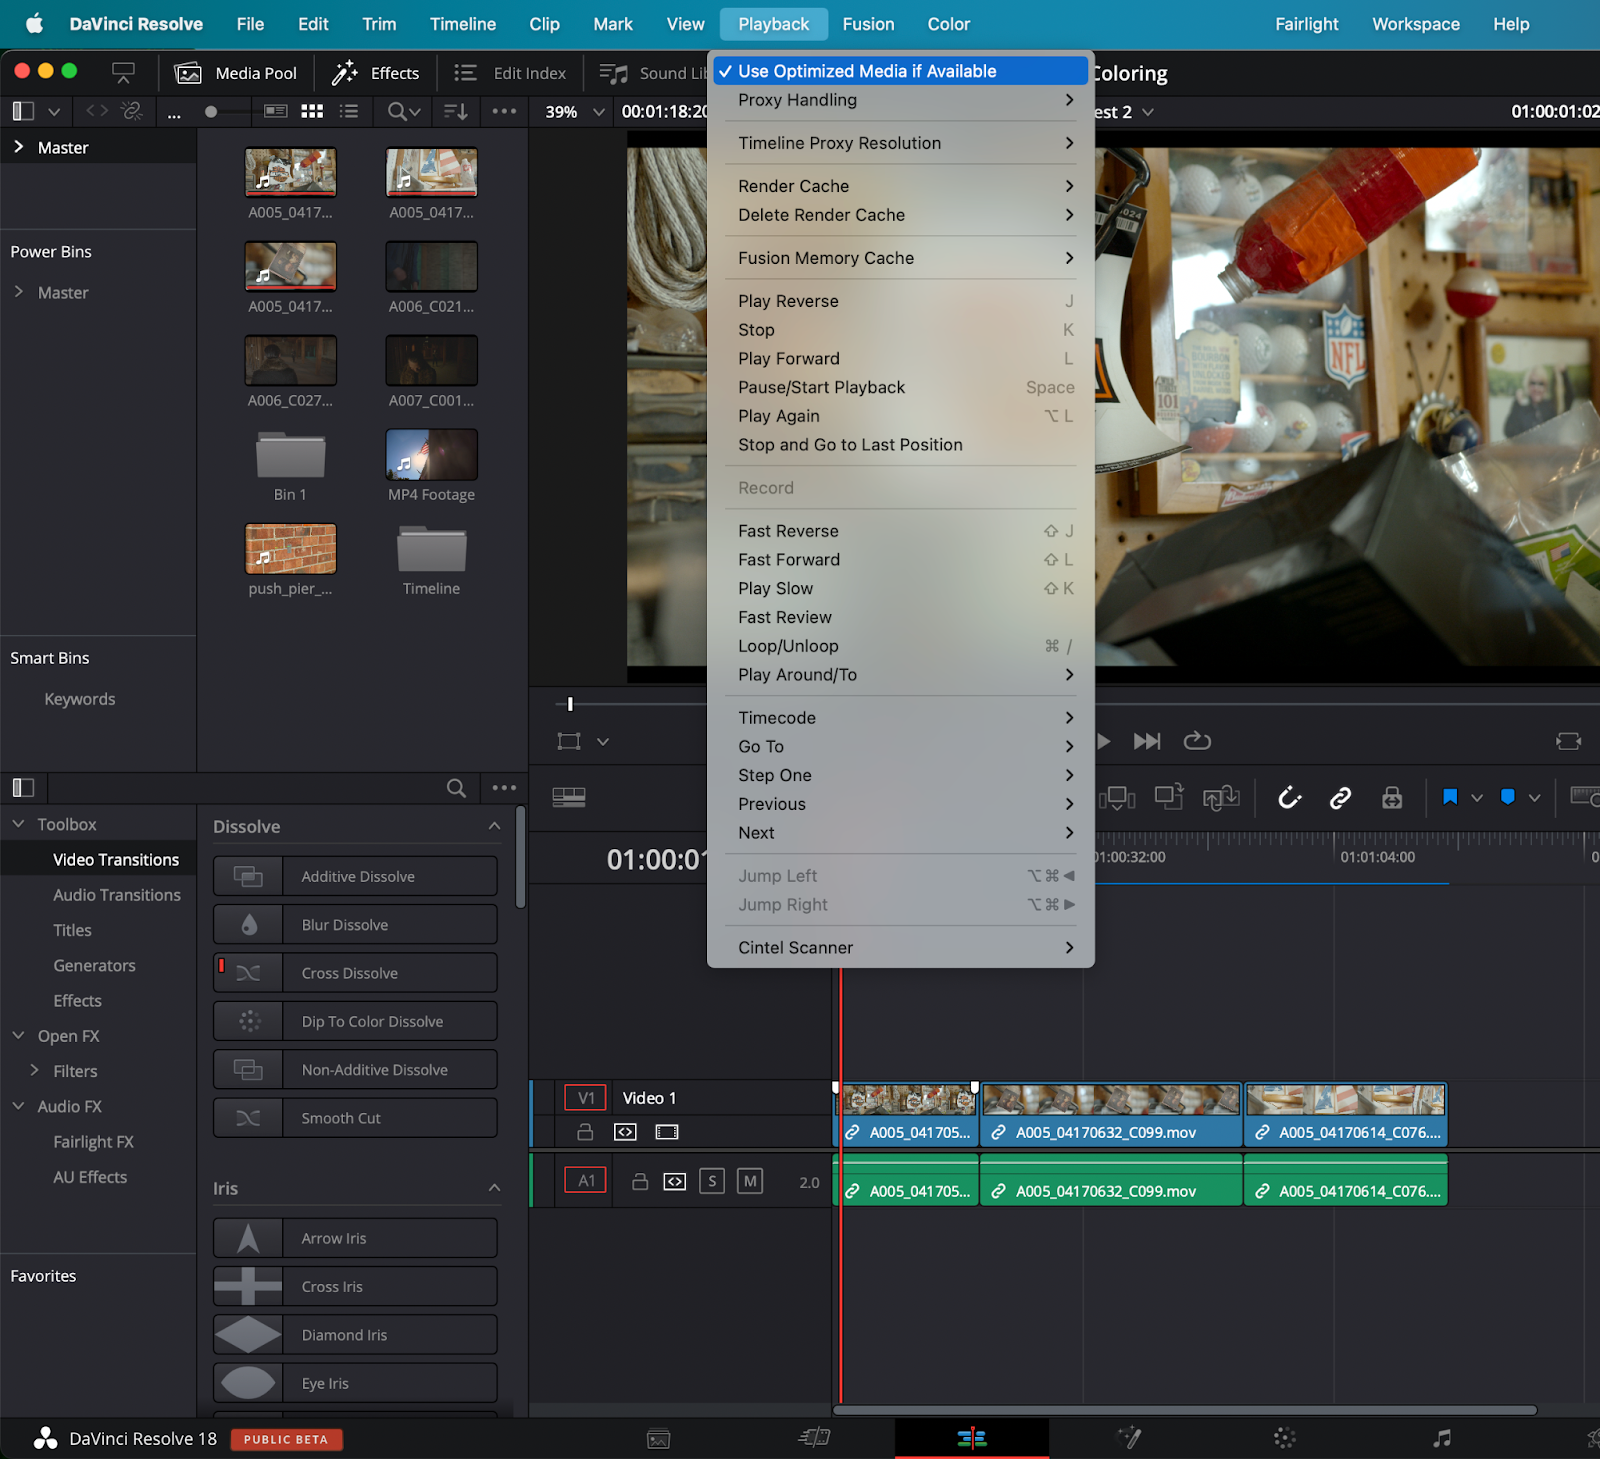
This might take a little while, but you’ll now have optimized media clips to work with in place of the originals, leading to very smooth playback. After this, you’ll need to go to Playback > Use Optimized Media If Available to activate your optimized media. Switching this on and off will switch between the optimized media clips and the original clips.
4. Proxy mode
Proxies operate similarly to optimized media but are more efficient and offer much better playback depending on the codec that you choose. Timeline proxy mode allows you to playback videos in quarter resolution, half resolution, or full resolution as well.
Go to your Project settings > Master Settings > Proxy media settings. You’ll have options to choose the resolution and format of your proxy here. On low-end devices, choosing a low-resolution and low-quality file type like Prores 422 Proxy is ideal.
You’ll then need to generate your proxies. All you need to do is go into your media pool and select all of the clips that need proxies. You’ll then want to right-click inside the media pool and select Generate Proxy Media.

To ensure your proxies are enabled, you’ll need to select List View and then right-click on the clip name and select Proxy Media Path.
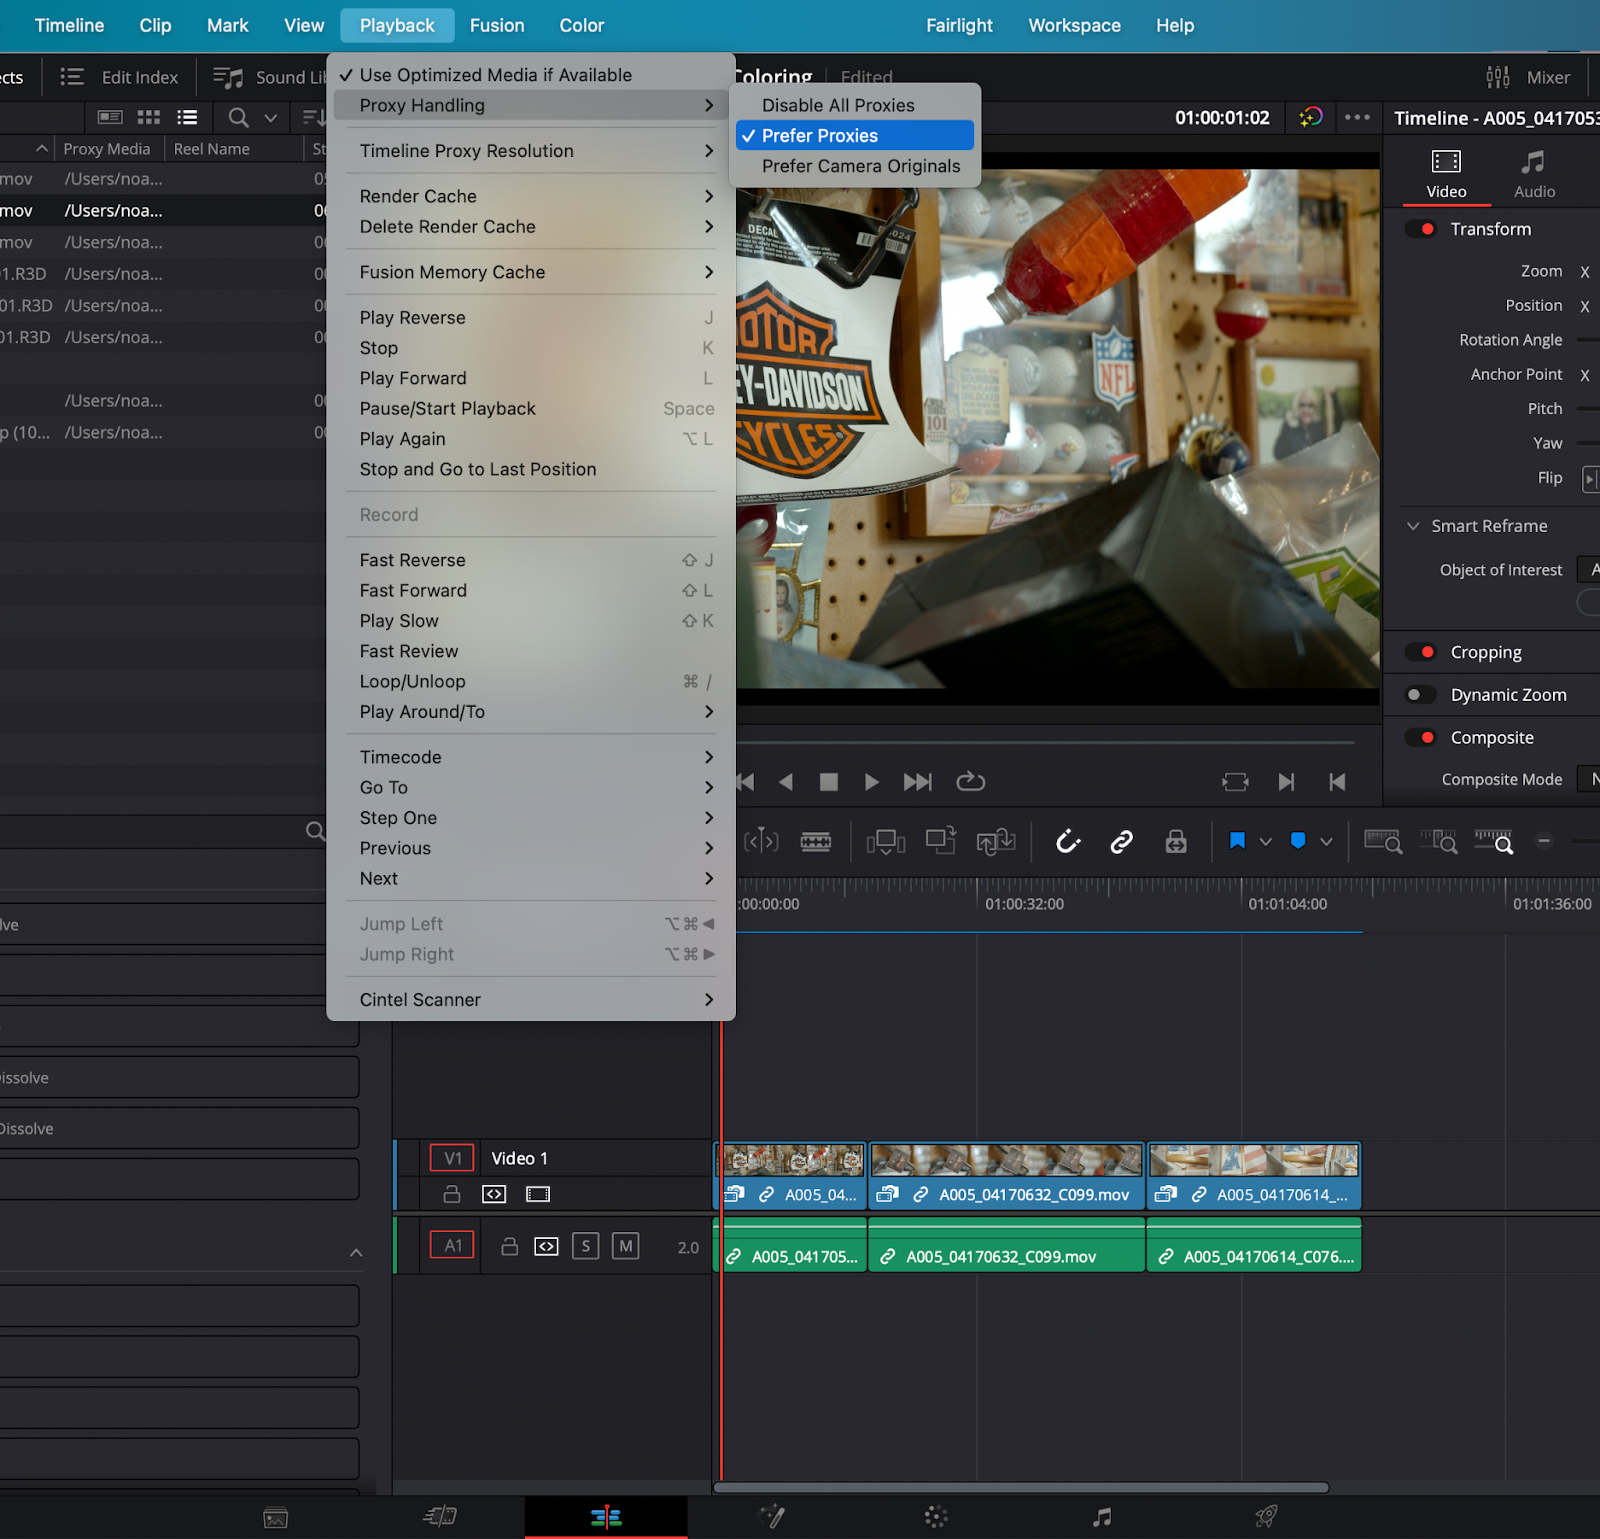
The proxies still won’t be enabled after this though. To fully enable them, you’ll have to click on Playback > Proxy Handling > Prefer Proxies. To disable proxies, you’ll want to clock on Playback > Proxy Handling > Prefer Camera Originals.
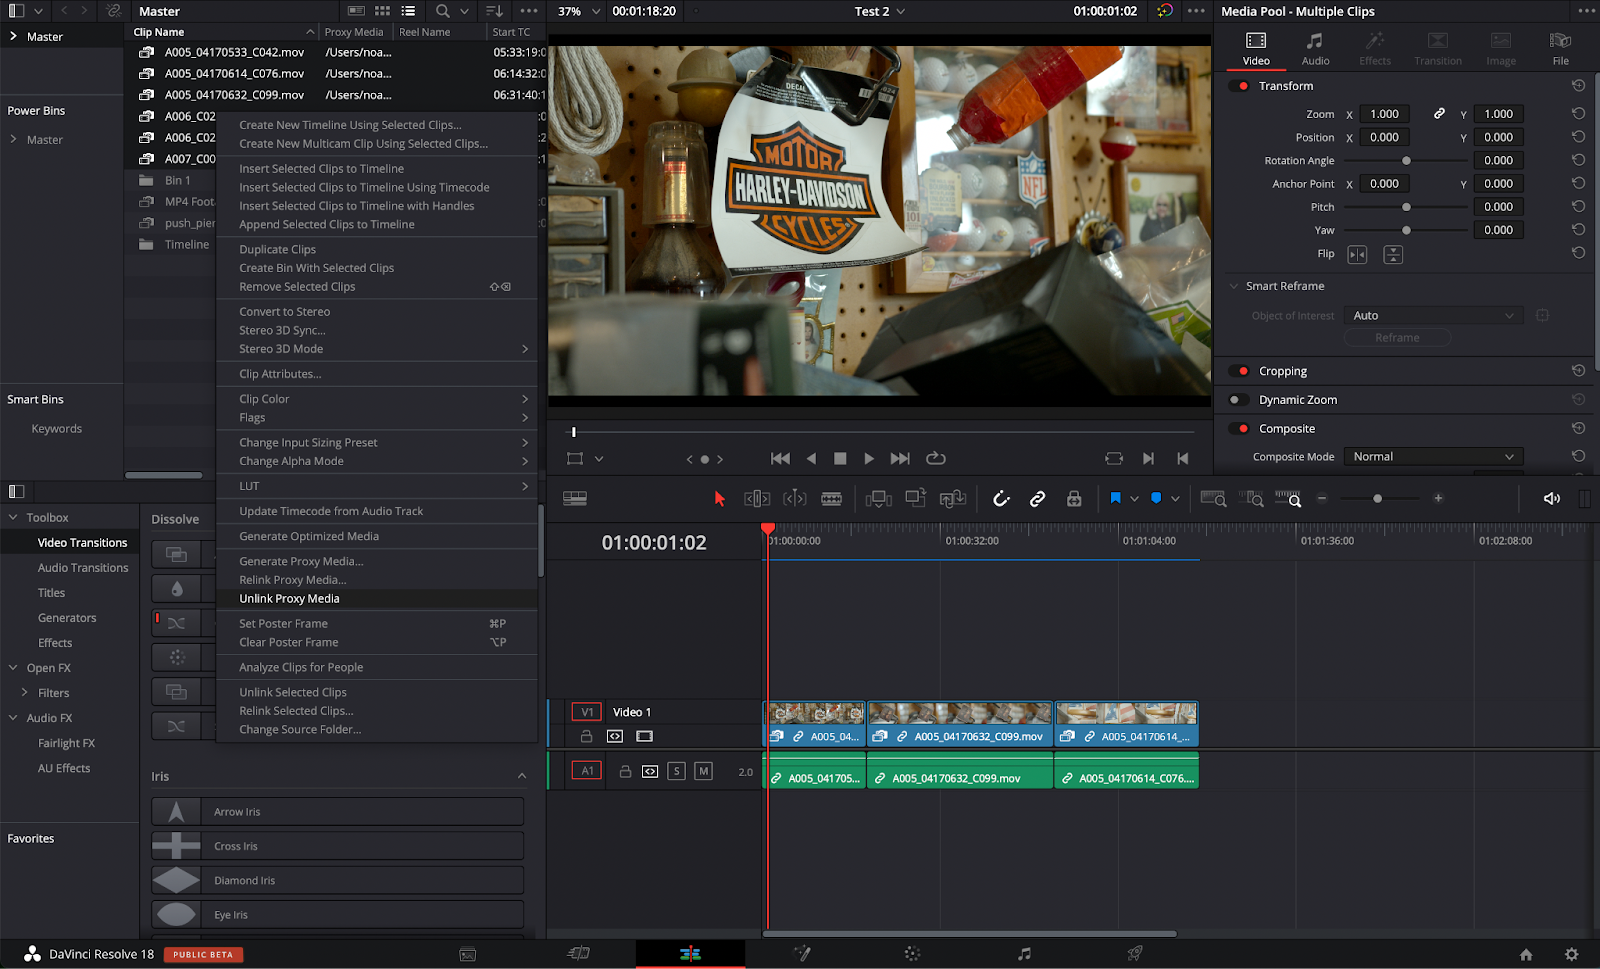
What if you want to unlink your proxies? DaVinci makes this super simple. What you’ll want to do is select all of your clips that have proxies attached to them and right-click in the media pool. You’ll then want to select Unlink Proxy Media or Relink Proxy Media if your clips need to be relinked.
5. Optimize cache location
It may not seem like a big thing but changing the location of your cache can make a huge difference in performance. It’s actually recommended that you have your cache on a separate SSD if your PC allows for it. A lot of professional editors have a separate SSD for their operating system, cache, and video files.
Selecting where your cache goes is as easy as going to Project Settings > Master Settings > Cache Files Location.
6. Render in place
This method is so simple and only requires one button click. Rendering in place performs a one-off, high-end render that offers great playback. This is handy for clips with lots of visual effects, multiple nodes, and heavy color correction.
Right-click on the clip that you want to render and select render in place. A pop-up window will appear giving you a slew of options including format and codec ones. It also gives you options for including fusion effects. Resolve will then ask you to save the render to a folder of your choosing on your computer.

7. Get DaVinci Resolve Studio
While the free version of DaVinci Resolve is amazing, DaVinci Resolve Studio offers slightly better performance and an improved editing experience. The performance of DaVinci Resolve is heavily reliant on the GPU of your system.
The free version of DaVinci Resolve limits you to one GPU for encoding, decoding, and exporting footage whereas the studio version of Resolve allows you to use multiple GPUs for this process. Blackmagic Designs recommends using Nvidia GPUs for this process as well.

How to measure playback performance in DaVinci Resolve
When playing back a clip, it’s super handy to see what the real-time playback is for it. This comes in handy when determining if you need to use the above methods to improve performance.
Playback is measured at the very top of your timeline. When you click play, the timeline framerate will appear. If this is lower than the framerate of your video file, you’ll need to adjust some settings in order for smoother playback.

Wrapping up
DaVinci Resolve is one of the best and most accessible NLEs on the market for both beginners and professionals. Working with high-resolution footage can be incredibly tricky and frustrating sometimes, especially when working with an underpowered machine. Video editing doesn’t have to be a pain though, utilizing methods such as proxies, optimized media, and cache can help make this process a breeze.
Simon Says integrates seamlessly with Resolve, allowing you to transcribe right within the platform, all without hindering performance.