How to transcribe and subtitle in DaVinci Resolve (Macs)
Native integration with Resolve is here! Transcribe clips and subtitle timelines in Resolve (macOS) with Simon Says' Mac app.
Wooohooo. With Simon Says and a couple of clicks you can now easily transcribe clips and timelines natively in Blackmagic DaVinci Resolve. Then receive markers (which attach to clips) and subtitles (which attach to sequences).
This article has three sections: 1) installation instructions 2) how to add transcript markers to clips 3) how to caption timelines/sequences. Jump to the one you need.
If you're looking to transcribe/subtitle in Resolve for Windows, see this article.
If you've followed the below installation instructions, see here for troubleshooting
Requirements for Mac users
- Mac computer with DaVinci Resolve v16, v17, or v18 installed. We support both free and paid versions of Resolve. Resolve needs to be downloaded from Resolve's website, not from the Mac App Store (as the one from the Mac App Store installs to a different, unsupported directory).
- If you're using macOS Monterey (or later), you will need to Python (instructions below)
- Latest Simon Says macOS app downloaded and installed:
Download: Simon Says Mac App (Intel)
Download: Simon Says Mac App (M1)
If you have already followed the below instructions and are having issues, here is a troubleshooting guide.
Install the python scripts for Resolve 18 (updated Nov 12, 2022)
Manual Install:
- Download Python 3.10.8 and install it, especially if you are on Monterrey or newer operating systems. You'll need to restart your computer after installation.
a. macOS Monterrey and subsequent OSes no longer included Python. You need to install Python to run the scripts in the Simon Says extension.
b. Please use this version of Python; other versions of Python may not work.
- Download the scripts for the Simon Says extension (updated Nov 12, 2022: updated to fix issues in Resolve 18.1)
- Place the scripts here on your computer:
/Library/Application Support/Blackmagic Design/DaVinci Resolve/Fusion/Scripts/Edit/Simon Says Transcription
==Please note this is a different folder location than previous versions of the Simon Says extension==
- Download the Simon Says Mac app, which serves as a helper to the Resolve scripts
(some users have reported that the Simon Says Mac app (M1) doesn't work with these scripts so use the Simon Says app from the Mac App Store.)
Confirm the scripts are installed correctly:
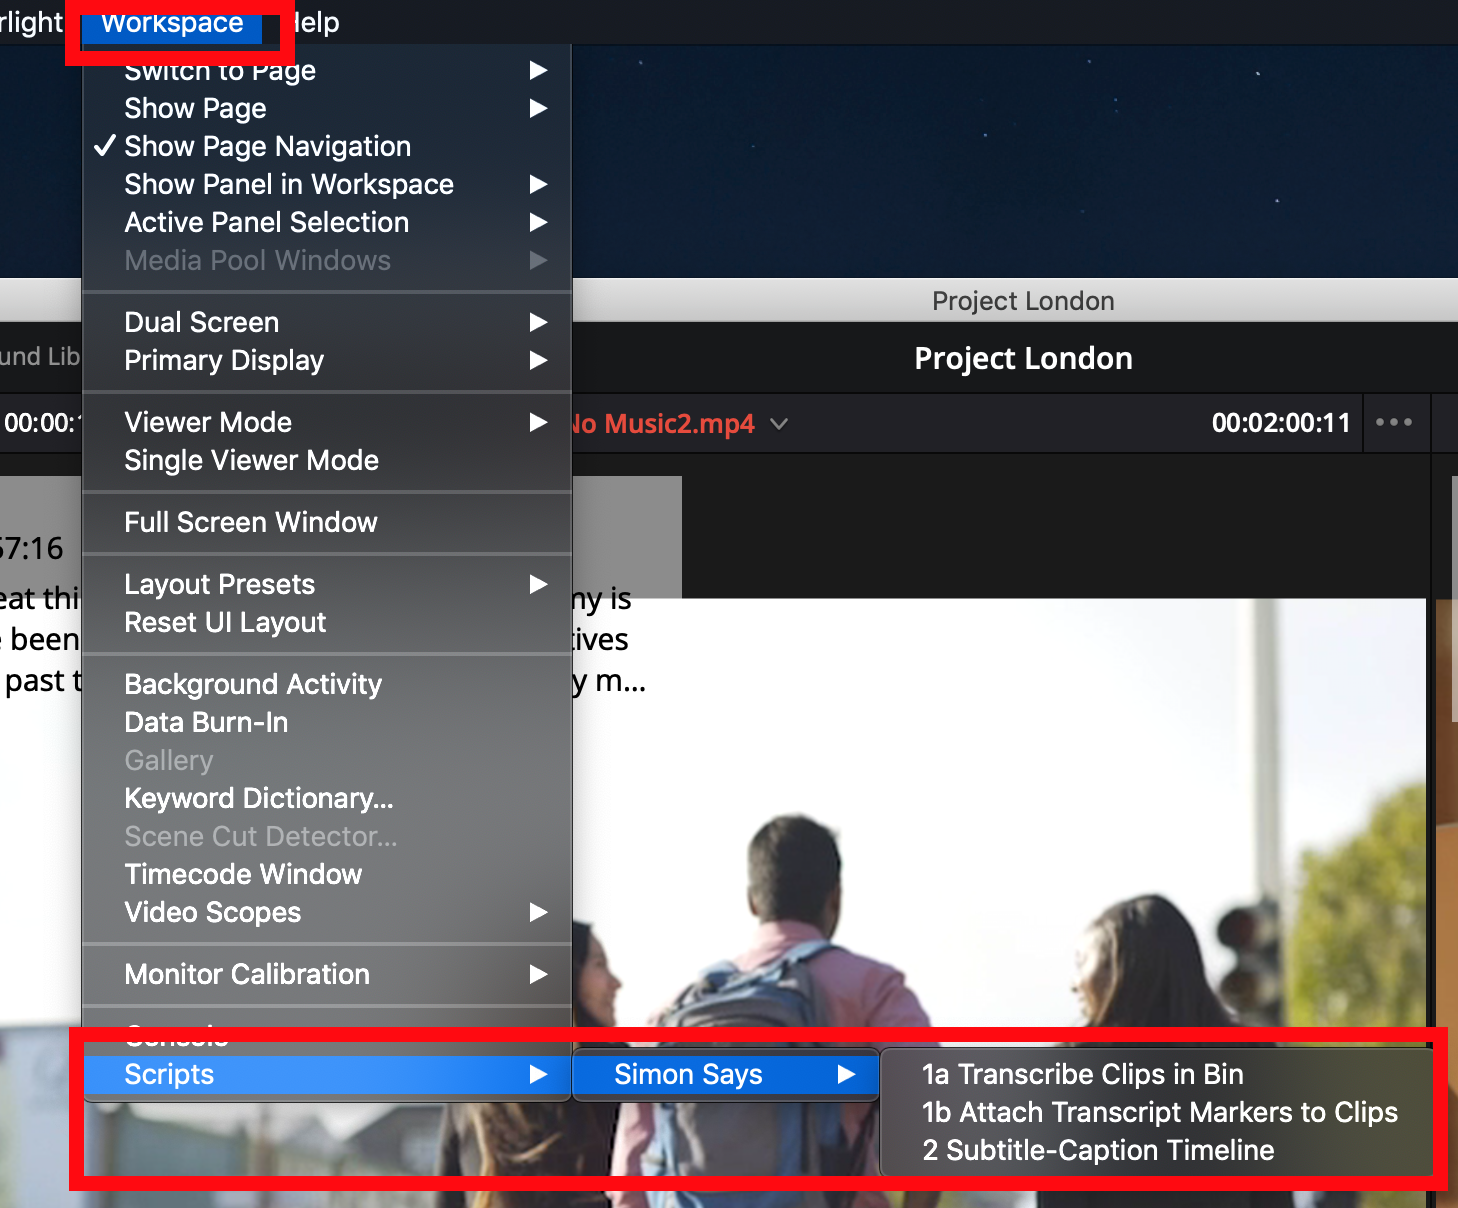
Open DaVinci Resolve and check the scripts are in the menu Workspace / Scripts / Simon Says

If you run these scripts and you will see an OS warning:
Go to the Apple dropdown and choose System Preferences and then select "Security & Privacy". You will see a screen like this (below); click "Allow Anyway".
TaDa! You are good to go! Jump to the chapter below on "How to transcribe clips and subtitle timelines."
Installation guide for previous versions
Use the "Alternative way" option below if you are on Resolve 17.2+.
Resolve supports external integrations using Python scripts. Simon Says installs these scripts so you can transcribe and caption.
Best way to install:
The python scripts correctly downloaded and installed. You can install the scripts automatically from the Simon Says macOS app v3.6+ from the "Simon Says Transcription" menu. If you don't see the option in the menu, that means you have installed it correctly (or are on an old version of SS macOS app).
Alternative way:
Manual Install. Download the scripts here (updated Oct 9, 2022).
Move all the files in the ZIP folder to one of these locations:
All users (recommended):
/Library/Application Support/Blackmagic Design/DaVinci Resolve/Fusion/Scripts/Comp/Simon Says
or Single user (not recommended):
~/Library/Application Support/Blackmagic Design/DaVinci Resolve/Fusion/Scripts/Comp/Simon Says
You will need to create the folder "Simon Says"
Confirm the scripts are installed correctly:
Open DaVinci Resolve and check the scripts are in the menu Workspace / Scripts / Simon Says
If you run these scripts and you are on Catalina, you will see this warning:
You need to go to the Apple dropdown and choose System Preferences and then select "Security & Privacy". You should see a screen like this (below); click "Allow Anyway".
TaDa! You should be good to go!
How-To Transcribe Clips and Subtitle Timelines
Video overview:
Make sure to open both Resolve and Simon Says applications.
1. Transcribe Clips and attach markers to them
a. index the clips in your Resolve bin
- select a bin with clips (multicams are supported | Learn more)
- go to the menu Workspace / Scripts / Simon Says and select "1a Transcribe Clips in Bin"

- once it indexes, open the Simon Says Mac app and a new project will have been created. Simon Says then transcodes and uploads the clips for transcription.
- click "Transcribe" in the Simon Says Mac app and pay.
- once Transcription is complete, click Export, choose the Resolve icon, and choose "Markers".

b. reconnect transcript to the clips in Resolve
- go back to Resolve. From its menu Workspace / Scripts / Simon Says, select "1b Attach Transcript Markers to Clips"
TaDa, markers will seamlessly reconnect!
Advanced: you can make edits in Simon Says, such as add notes and speaker names and they will intuitively and appropriately roundtrip back to Resolve.
2. Caption/Subtitle your Edit
Caption and subtitle (including translated subtitling of) your timeline:
- make a timeline active in Resolve
- go to the menu Workspace / Scripts / Simon Says and select "2 Subtitle-Caption Timeline"

- once it exports, open the Simon Says Mac app and a new project will have been created. Simon Says then uploads the exported timeline for transcription.
- click "Transcribe" in the Simon Says Mac app and pay.
- once Transcription is complete, click Export. (If you are looking to translate, do it at this step.) Choose SRT subtitles. It downloads to your Downloads folder. Unzip it.

- go back to Resolve and locate the downloaded SRT file and import it
TaDa, captions / subtitles will seamlessly reconnect!


