
Organizing Your Interview Footage - The Right Way
Organizing your interview footage diligently is one of the best ways to save yourself tons of extra time and headache on an edit. Here are some of our favorite tricks.
Every editor has been there a hundred times. It’s late at night, you have a massive deadline to hit, and you remember a subject saying a specific statement that fits perfectly in your current place in the edit. No matter where you look, you can’t find that one clip. You have so much interview footage that it’s actually a problem.
Let’s say that clip is buried an hour deep into a two hour interview, and you now have to quickly scan through it, or just get extremely lucky hopping the playhead around the timeline.
Well, even though this will happen to you, no matter what—there are a ton of different ways to make sure that this happens far less often.
Folder Structure
Creating the right folder structure for your interview footage is a personal preference process. There isn’t necessarily a specific right way to do this aspect, but there is a wrong way—simply not doing it.
Everyone will likely have a different method, but my advice is to find one that works for you and stick with it.
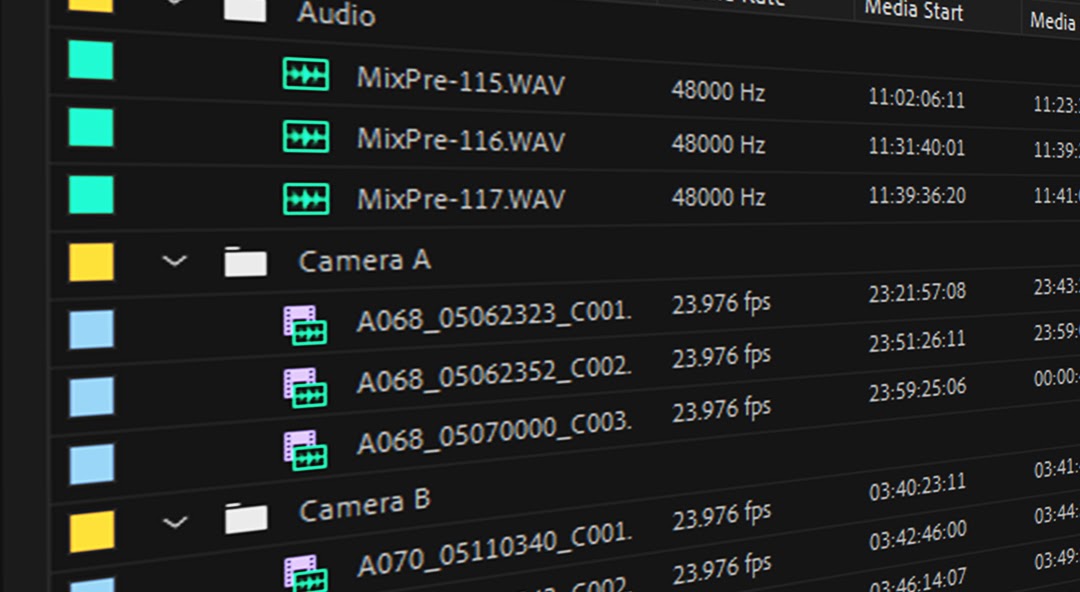
My preferred method is to have a folder with all of my A-camera footage, one with all of my b-camera footage, and one with my audio (pictured above).
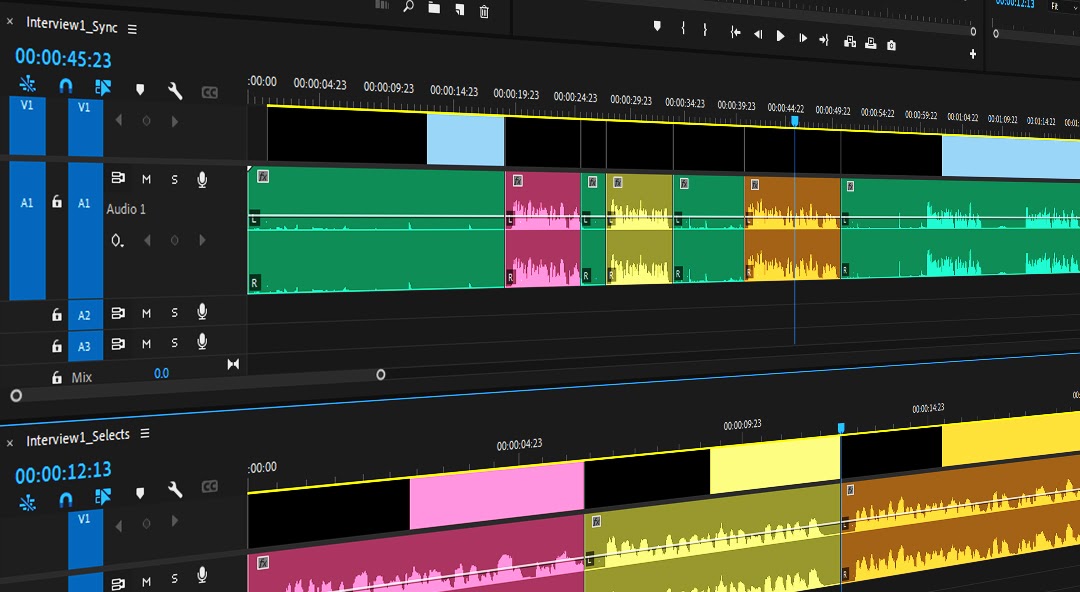
Now I go through each subject, and group all of the various pieces into each subject’s own “sync sequence”. This is where I’ve synced both the A and B camera footage to the recorded separate audio.
Sync Sequence / Selects Sequence

Now, once you have each of your interviews laid out in their own synced sequences (where all footage and audio is grouped together appropriately), I like to make a duplicate of each one, and call the duplicate “Selects” for that subject.
Now, as I listen to the full interview in the “Sync Sequence”, I can make cuts on clips that I like. From there, I tend to add a color to each cut out clip, using a “Heat Map” approach. Clips that I know I’m going to use I mark with a red color, clips that I might use with an orange color, and clips that may be useful with a yellow color. That way I can quickly gauge the effectiveness of a clip just by taking a quick visual glance at the timeline.

I leave each clip in place on the sync sequence, but then make a copy of each clip on the “selects” timeline.
This way you can always go back and find where each clip was at in the context of the interview, but you can quickly hop around your color coded clips and drag them into the main edit timeline.
Another word for this is “Pancake Style Editing”.
How It Helps

The best thing about organizing your footage this way (where the actual cutting of the interviews is almost separate from the way the footage is stored in your project), is that you know exactly where each person’s footage is located.
You have the “John Sync Sequence” and the “John Selects Sequence”, and you know that the footage in there is only the footage from John’s interview, not Betty’s. A lot of times you see all of the footage just thrown together haphazardly on one long timeline.
The idea is that as you listen to interviews, you should always have each statement you hear that might make the cut ready to go, and have it narrowed down from the rest of the scraps on it’s own timeline.
Doing this will always make the editing process go loads quicker.
How Simon Says Can Help Even More
Now, let’s say instead of doing any of this, you could have the footage organized correctly before you even get to the editing software? What if all of the good clips were already pulled, and you’ve got an .xml file ready to go with all of the clips you might want to use?
A selects sequence can be already made between you and your team before you ever even open up the editing software. Getting you that one step closer to the finish line that much quicker.

![How Our Emotions Affect Our Memories: Permanence [Part 2]](https://cdn.prod.website-files.com/621173d1c16e2272d70ece63/621173d1c16e229d920ed972_61002f20cc3b2d33801bba27_60abe7a4afb91be4cf54f785_1*rQIrqiI0uhAk-mKd_-Pe8A.gif)

