How to Crop Video in Adobe Premiere Pro
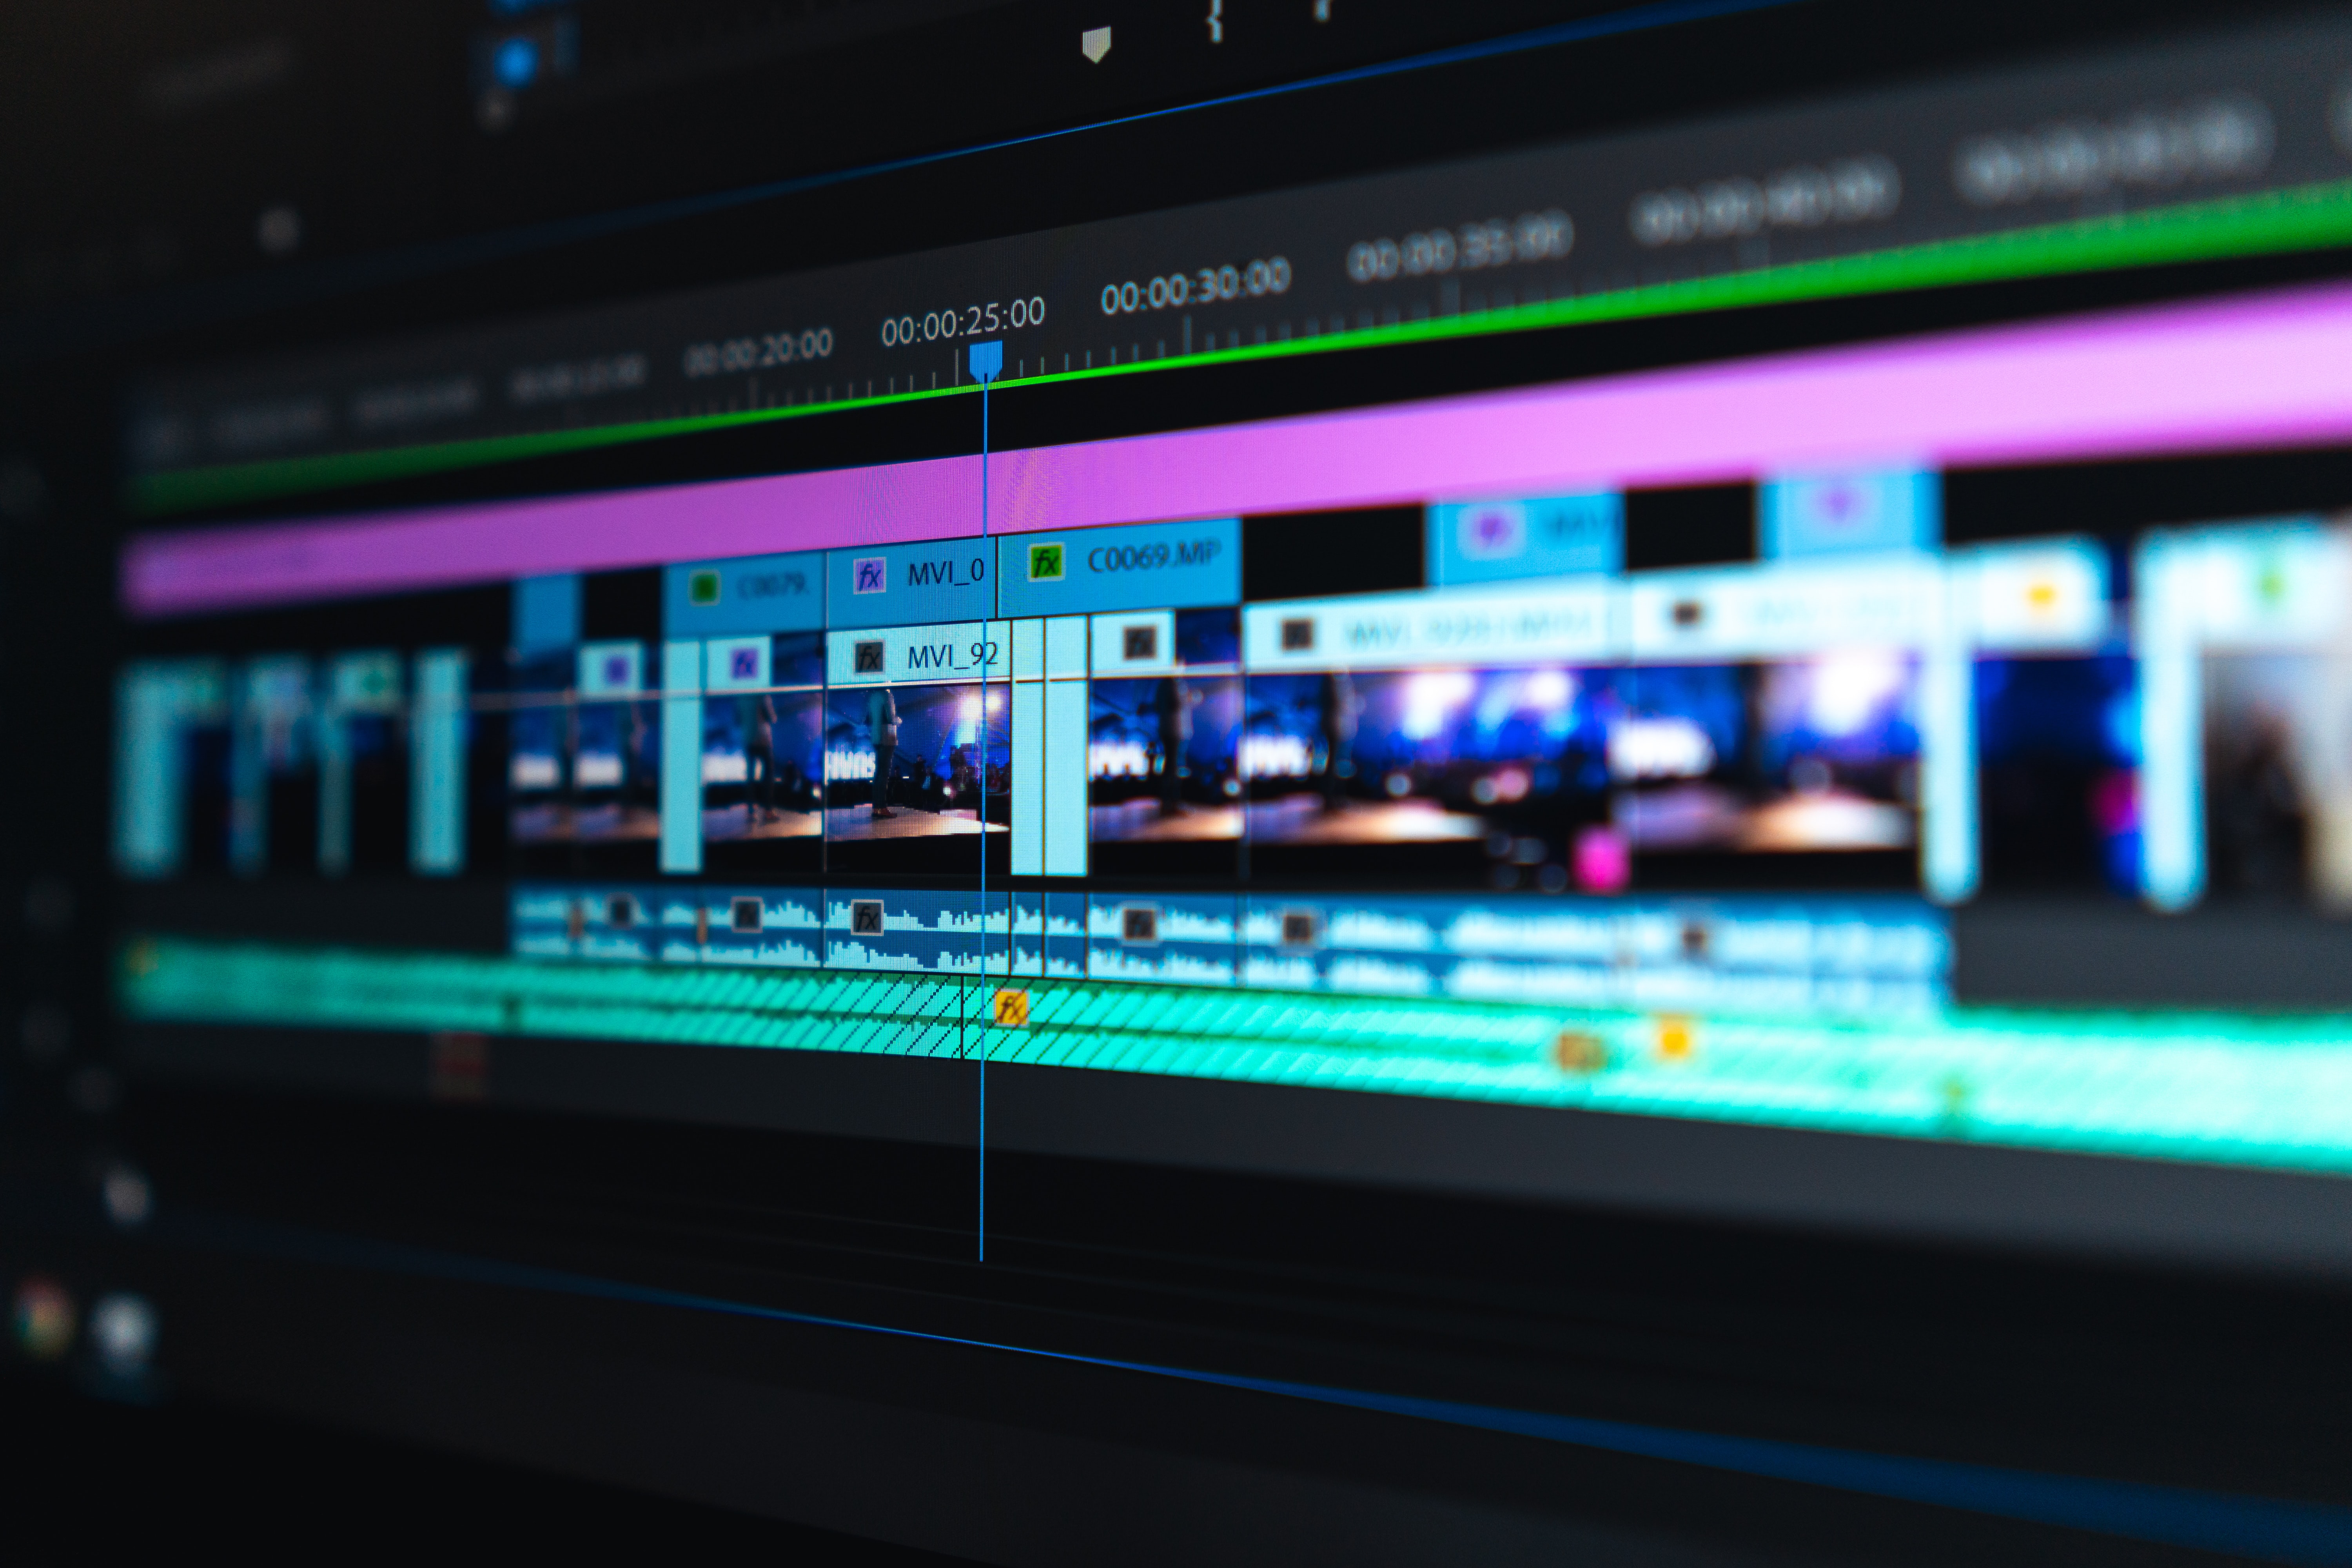
The introduction of NLEs was something of a renaissance for the post-production industry. Video editors were finally able to do things digitally that they weren’t able to do on film. This opened up the door to simplifying video editing techniques that were once incredibly complicated.
Among these is the cropping of videos. In the past, cropping in on a subject would have to be done in the production phases, entirely in-camera based on the aspect ratio. Now, cropping a video clip can be done right in post-production.
Cropping can be a great way to create split-screen videos or create content for social media platforms. In this post, we’ll walk you through some
Note: Adding captions to your videos is another great way to make your social media content stand out, given that many viewers watch videos without audio. With Simon Says, you can quickly add captions to your content directly in Premiere Pro.
Understanding aspect ratios in Premiere Pro
First, let’s go over aspect ratios since it’s easy to confuse this term with cropping. Aspect ratio is defined as the “ratio of the width to the height of an image or screen”. In other words, it’s essentially the frame size of your video. Aspect ratio is simply a ratio though. It’s separate from any actual sizing. The width and height of the pixels in your image are what determine the aspect ratio.
For example, a video with a width of 1920 pixels and a height of 1080 pixels (the most common resolution type) yields a 16:9 aspect ratio. If you divide the 1920 pixels by 120 and then divide the 1080 pixels by 120, you’re left with 16:9. This comes in handy when you want to change the resolution of your image while still yielding the right aspect ratio.
As stated before, choosing an aspect ratio for your video is different than cropping though. Video cropping just cuts off portions of the video clip while keeping it inside of the sequence of the aspect ratio. This is different than a program such as photoshop which uses the crop tool as a way to adjust the aspect ratio of the photo.
What are the common video aspect ratios?
Lucky for all of us, math is pretty much never required when figuring out which aspect ratio we should go with for our videos. There has been a lot of standardization when it comes to aspect ratios, and it’s very rare that you’ll ever use more than a select few. Below are the most common aspect ratios used in video production.
16:9
16:9 is the aspect ratio that you’ll most commonly find for computer screens, cinemas, and web content posted to platforms such as YouTube and Vimeo. For beginners, this is the aspect ratio to stick with due to its wide range of use cases.
1:1
This aspect ratio is a complete square and very common for social media. Instagram is one of the first things that comes to mind when thinking of a 1:1 aspect ratio since the platform was pretty much designed with it in mind.
9:16
9:16 is the perfect aspect ratio for phones. A lot more social media-based companies have been using the 9:16 aspect ratio based solely on the fact that most content nowadays is watched using a phone. Apps such as TikTok thrive off of the 9:16 aspect ratio with a lot of YouTube channels now even posting shorts in this video format.
4:3
While this aspect ratio less common now than it was in the past, it’s still an important one to know. The 4:3 ratio was used for broadcast television before 16:9 and the age of “widescreen” came about.
1.85:1
This is the “cinema standard” aspect ratio as there were a lot of films back in the day that used it. While not as popular anymore (and marginally different than 16:9), it still gets used for theatrical releases on occasion.
2.35:1
No aspect ratio will make an image look more “cinematic” than 2.35:1. Whenever you hear someone talk about the “black bars” on a movie screen, this is what they’re talking about. 2.35:1 is also referred to as “cinemascope” and provides a much wider and epic feeling image.
Tips for cropping video in Adobe Premiere
Cropping videos in Premiere Pro only takes a few simple steps and requires only one simple video effect. This step-by-step guide will go over everything you need to crop your videos for both Mac and Windows devices.
Importing Clip to Premiere
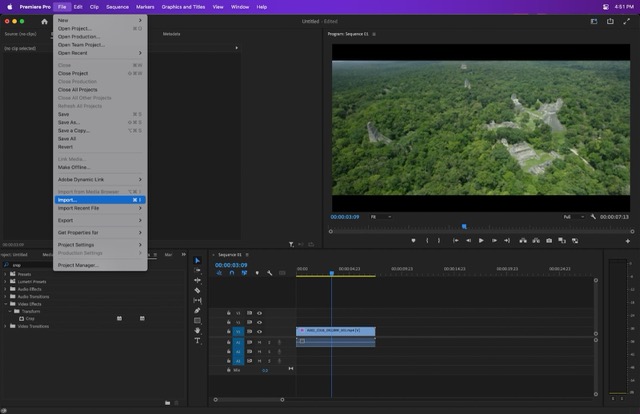
The first thing you’ll want to do after opening up Premiere Pro is to import your clip into your timeline. This can be done by going to File > Import or by clicking Command+I or Ctrl+I on your keyboard. You’ll then need to drag your clip into the timeline.
Applying the Crop Effect
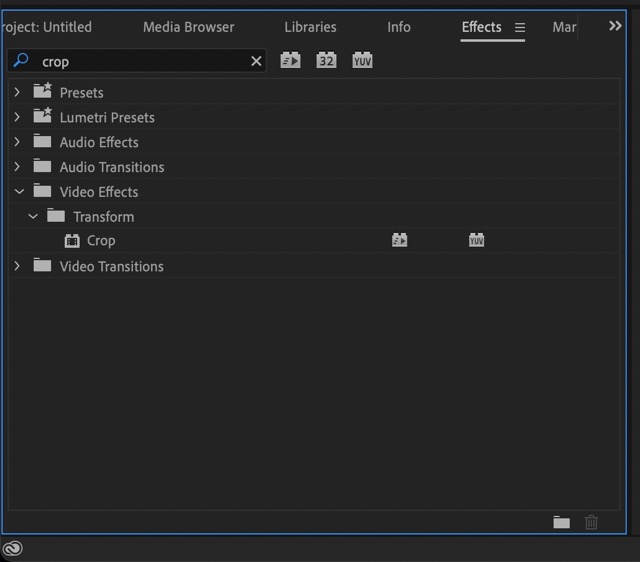
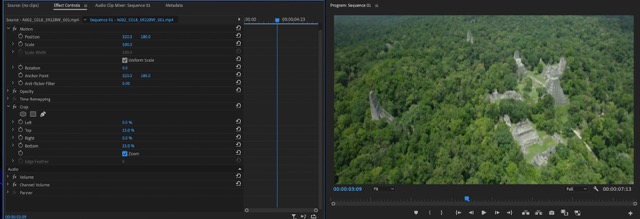
After that, you’ll want to go over to the Effects tab in the lower left-hand side of the screen which is host to a whole slew of editing tools. You’ll then want to go to the Video Effects drop-down menu and find Transform > Crop. This effect can be applied by dragging it onto your video file in the timeline. After this, you can find the effect in the Effects control panel on the upper-left-hand side of the screen.
There are four main crop options; left, right, top, and bottom crop. These options are dictated by percentage values. Changing these values with crop the bottoms of the sides of the video. For example, changing the top and bottom values to 15% in the crop settings will cut off the top and bottom of the video.
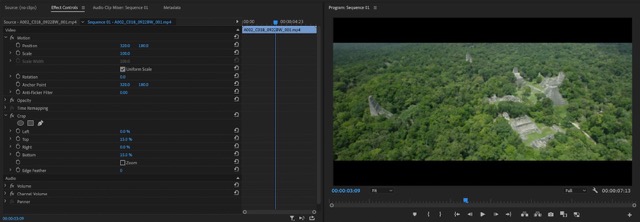
If you want to get rid of the black bars and have your footage fill the entire sequence, this can be done by clicking the Zoom checkbox beneath all of the percentages. This will warp the video clip though, so it’s best to only use this in very specific circumstances.
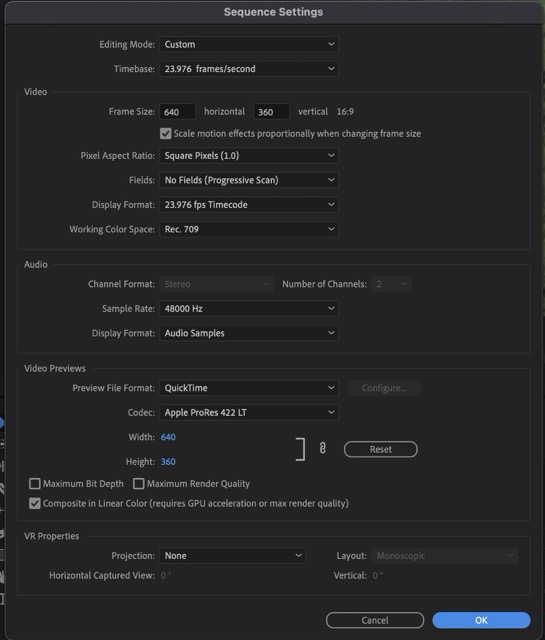
Changing Sequence Size
Sometimes changing the aspect ratio of your sequence is required in certain circumstances. This can be done by Right-clicking on your sequence and clicking sequence settings.
A pop-up window will appear where you can change the horizontal and vertical pixels of your sequence. Changing this will also change the aspect ratio of the sequence as we talked about earlier. There is also a variety of presets from the Editing mode drop-down menu.
Resizing a Video in Premiere Pro
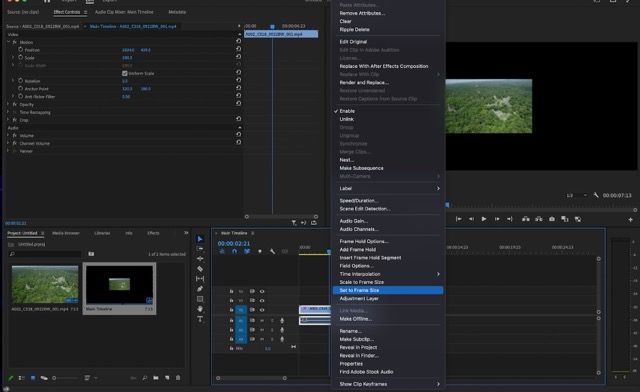
Once a sequence is changed, the footage will often have to be resized. This can be done simply by going to the Effects control panel and changing the scale of the footage.
You can also right-click the footage in your timeline and select Scale to Frame Size. This will adjust your footage to the scale of the sequence. Tiny adjustments can then be done using the scale tool in the effects control panel.
Conclusion
Cropping in Premiere Pro is such a simple yet effective tool for editing your content. Remember, the more time you can save as a video editor the better. That’s why third-party extensions like Simon Says are invaluable if you want to add robust and convenient functionality to your editing workflow.