How to Change Clip Speed in DaVinci Resolve
Today’s video editing programs simplify many aspects of production. Among these is the speed ramp effect. In the past, speeding up a clip would have to be done in the production phases using some sort of high-speed camera. Now, speeding up a clip can be done right in post-production. NLEs such as Blackmagic Design’s DaVinci Resolve, Final Cut Pro, and Adobe Premiere Pro CC have made speed-ramping footage more accessible than ever.
While typically known as a color grading and color correction tool, DaVinci Resolve is an incredibly capable editor that has an amazing speed effect. This beginner’s DaVinci Resolve tutorial for mac and windows devices will go over how to make speed changes inside DaVinci Resolve 17 and DaVinci Resolve 18.
Note: Simon Says can add even more simplicity to working with subtitles in DaVinci Resolve. With the native plugin, you can automatically generate captions and transcribe your content in 100 different languages.
Why would you want to change video speed?
Speed ramping is the process of digitally speeding up and then slowing down a video clip. This is a great technique for corporate videos or for hyper-stylized filmmakers who need this effect in their workflow. A speed ramp typically works best by speeding up slow-motion footage for a short period of time before slowing it down again. This technique was made popular in films through Zach Snyder who famously used this technique in the movie 300.
Slow-motion videos are typically best for the speed-ramping effect because of the high frame rate that it was shot at. A higher frame rate video leads to smooth speed ramping because of the number of frames in the video. While speed ramping is still incredibly possible at normal speeds, slow motion will for sure yield the best results.
So, why speed ramp? Well, for those in the corporate world of video editing or creating content for social media, speed ramping is almost an absolute necessity. Speed ramping can be used to bring the audience from one scene to the next in a spectacular fashion or to emphasize a certain point in the video. In filmmaking, it can be used to make a scene more “epic” seeming than it would normally be.
If you can, keep speed ramping in mind while shooting your video. Knowing what you’re going to speed ramp in post-production makes the actual speed ramp itself look much better than it normally would.
Changing clip speed in DaVinci Resolve
There are a few different ways to speed ramp inside DaVinci Resolve. Something to note is that speed ramping is NOT the same as changing the frame rate of your video. Changing the FPS (frames per second) gives a much different effect than speed ramping does.
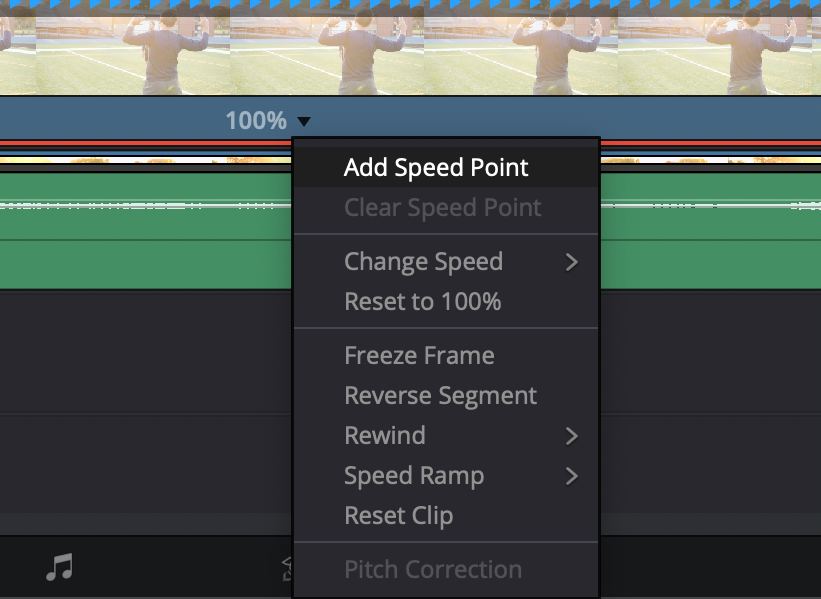
Speed remapping in DaVinci Resolve is incredibly easy and can be done with only a few clicks. You can change the speed of your clip by right-clicking on your video clip and going to Change Clip Speed in the drop-down menu. A pop-up window will then appear, presenting you with a range of options for changing your clip’s speed.

Moving the percentage of the clip speed will result in different speeds for your video clip. You can drag these points to the left or the right to result in a smooth speed transition in the speed controls. There is also an option to adjust the frame rate of the clip, though, it’s best to leave this setting alone in order not to mess up your clip too much. On top of this, another option in this menu allows for a freeze frame effect to occur along with another option to reverse the speed and ripple sequence.

You can also click the keyboard shortcut ⌘R (or ctrl+r on windows) to access the speed settings of that individual clip within the timeline. This will bring up the speed change tool inside the timeline which is indicated by a bunch of blue arrows.
You’ll then be able to add speed points that work incredibly similarly to keyframes. Speed points let you quickly speed up and then slow down a video clip. Fool around with the speed of the clip you’re working with as well as these settings to see what works the best for you. Decreasing the speed on selected clips will give a slow-motion effect whereas speeding these clips up will make the motion choppy and quick.
There are a lot of speed-ramping techniques that can be utilized once you master this effect. Smooth transitions can be created through the use of DaVinci Resolve speed ramps as well as intense pans or whips with a lot of motion blur.
Again, speed ramping is something that is hyper-specific to the type of content you’re trying to create, so play around with it using these techniques to see what you’re able to come up with.
If you’d like, you can also use a series of plugins to speed up or slow down your footage that way. Some presets will allow you slightly more control when it comes to changing the speed/duration of your clip.
Conclusion
Speed ramping in apps such as DaVinci Resolve is a simple yet effective way to add production value to your content. If done well, a speed ramp can elevate content to an insane degree and make for a rollercoaster of a ride.
Small tips and tricks such as these are essential when editing content for the sake of efficiency. The more time saved as a video editor the better. That’s why third-party extensions and plugins like Simon Says are so important in DaVinci Resolve and other NLEs.