How to Transcribe Audio to Text with Google Docs in 2023
Are you tired of manually transcribing audio files for your podcast, video file, or subtitles? Fret not; we have a solution for you. In this guide, we'll explore how to transcribe audio using Google Docs Voice Typing, a free transcription tool that harnesses the power of Google Chrome's speech recognition technology.
Imagine yourself sitting back, relaxing, and letting your Chrome browser work its magic on your English audio recordings. The voice typing feature in Google Docs is easy to use and compatible with multiple devices, including Android, iOS, iPhone, and even Zoom meetings. Just look for the microphone icon and start dictating your thoughts or conversations in real time.
But wait, there's more! We'll also dive into better alternatives to Google Docs for transcription. So, join us as we navigate the world of audio transcription, from Google Docs voice typing to the most efficient transcription tools and services available. We'll cover everything from pricing to APIs, proofreading, and even how to convert audio files like WAV to text. So, without further ado, let's begin this exciting journey to enhance your transcription experience and make your life easier, one comma and question mark at a time!
What is Transcription?
At its core, transcription is the magical process of converting audio or video speech into text, meticulously capturing every nuance, emotion, and detail. From podcasters and filmmakers to market researchers and legal professionals, transcription is an essential skill for a wide range of industries. It's the unsung hero that helps us document interviews, create subtitles for movies, and even aid in language learning.
Transcription is not just about turning audio content into text; it's an art form that bridges the gap between the spoken and the written word. It's the unsung hero that enables people with hearing disabilities to consume content and engage with your work. Plus, it's a lifesaver for those who prefer reading at their own pace or need to search for specific information within a long audio file.
The process of transcribing audio can be a tedious and time-consuming task, but thanks to technological advancements, it's no longer a mission reserved solely for human hands. With an array of transcription tools, software, and services available, transforming your audio masterpiece into a written text has never been more fun and efficient.
How to Use Google Docs to Transcribe Audio
Ready for some fun? Let's dive into the step-by-step guide on how to use Google Docs to transcribe audio. With these simple steps, you'll become a Google Docs transcription maestro in no time!
Step 1: Prepare Your Audio File
Before you start, ensure your audio file is of good quality, with clear and audible speech. This will make the transcription process smoother and more accurate.
Step 2: Fire up Google Chrome
Make sure you have the Google Chrome browser installed on your device, as Google Docs Voice Typing only works with Chrome. Open the browser and navigate to the Google Docs homepage.
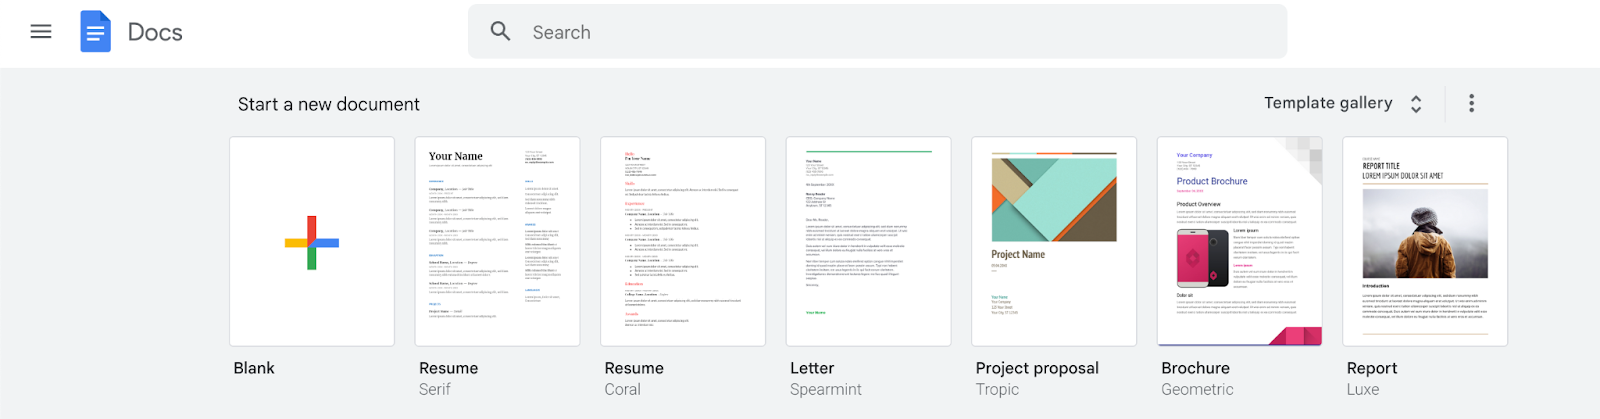
Step 3: Create a New Document
Once you're on the Google Docs homepage, click on the "+" icon to create a new document. This blank canvas will soon be filled with the transcribed text from your audio file.
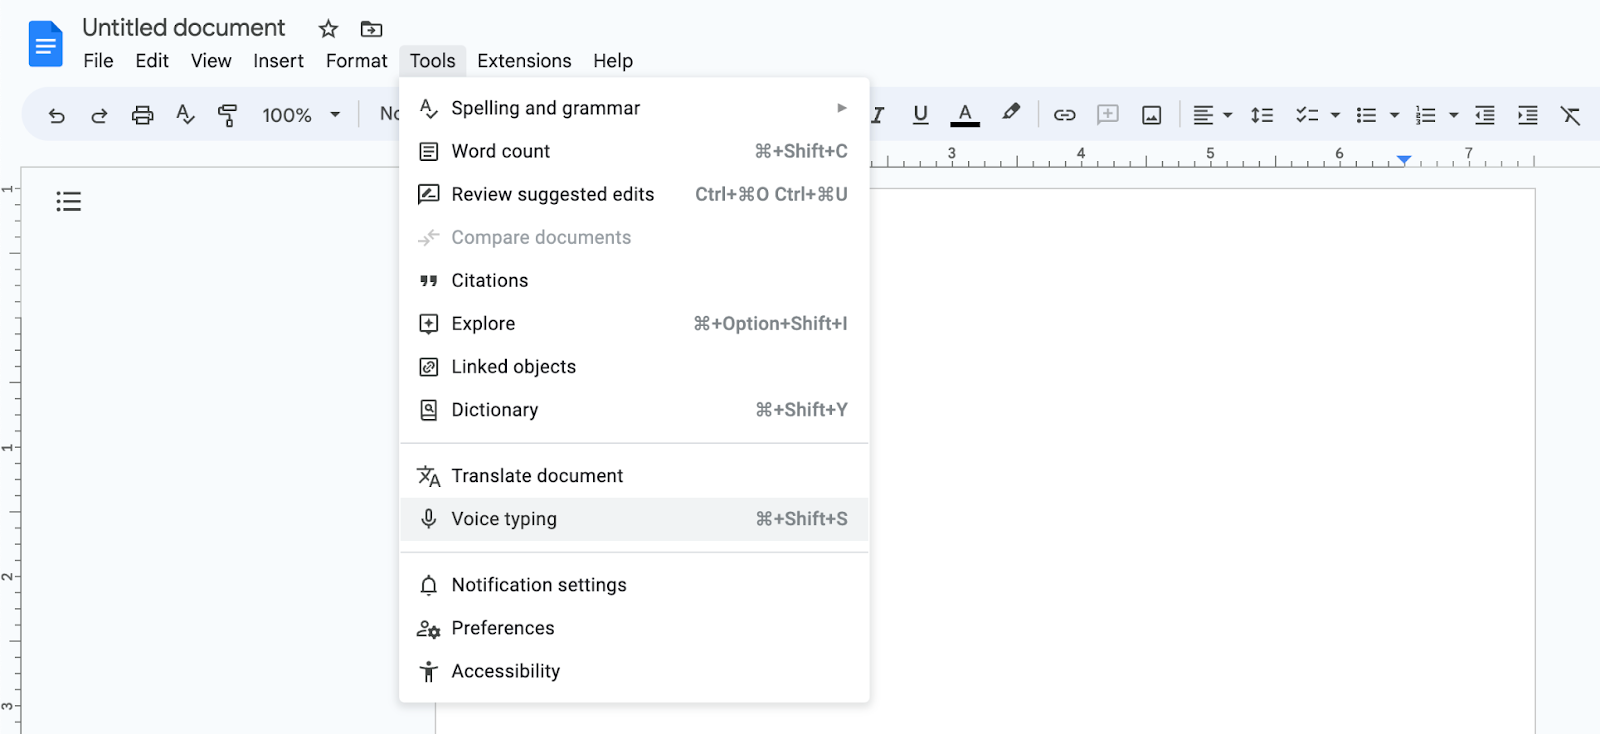
Step 4: Enable Voice Typing
In your new Google Docs document, click on "Tools" in the menu bar and select "Voice typing." A microphone icon will appear on the left side of your document. This is where the transcription magic begins!
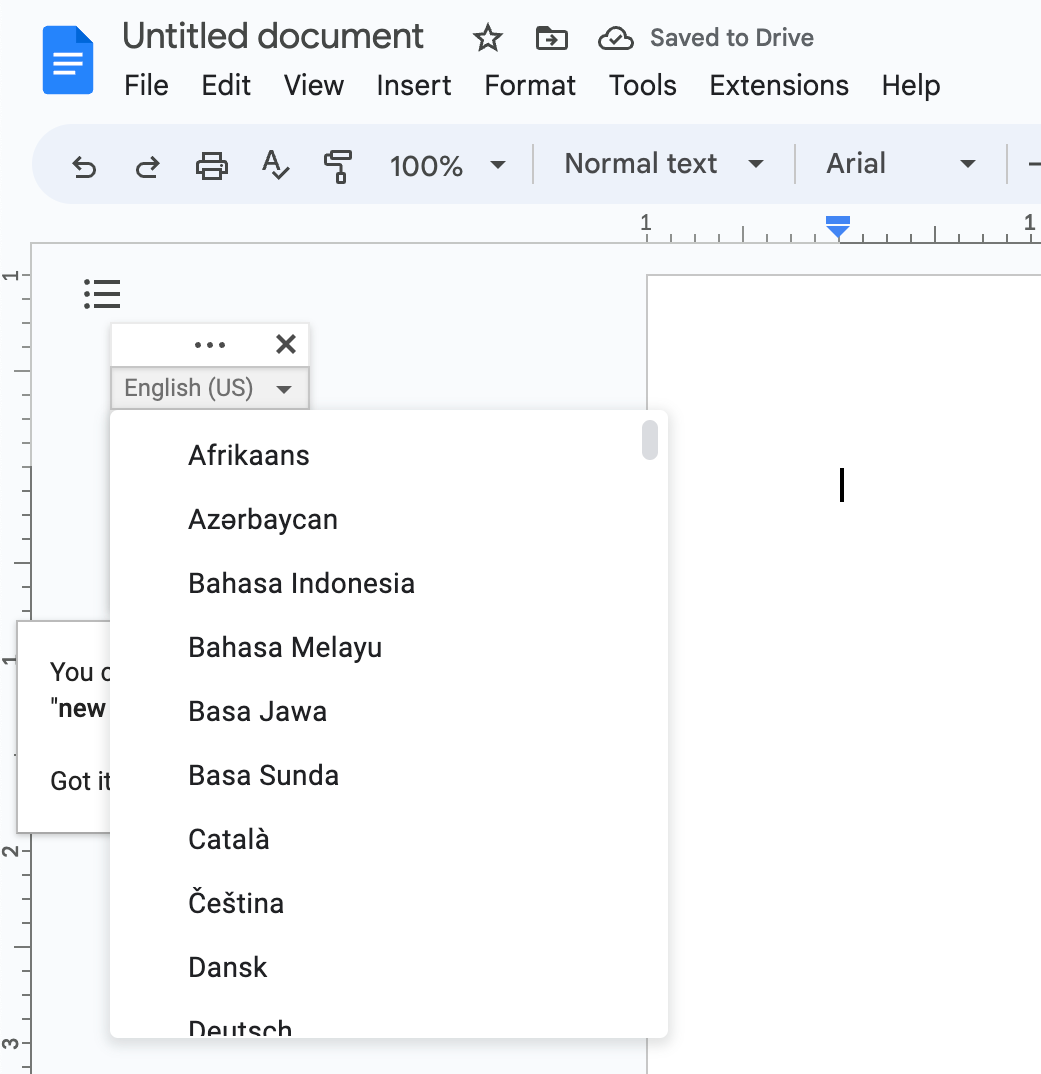
Step 5: Configure Your Microphone and Language Settings
Click on the microphone icon to configure your microphone and language settings. Ensure your microphone is set up correctly and choose the language that matches the audio file you want to transcribe.
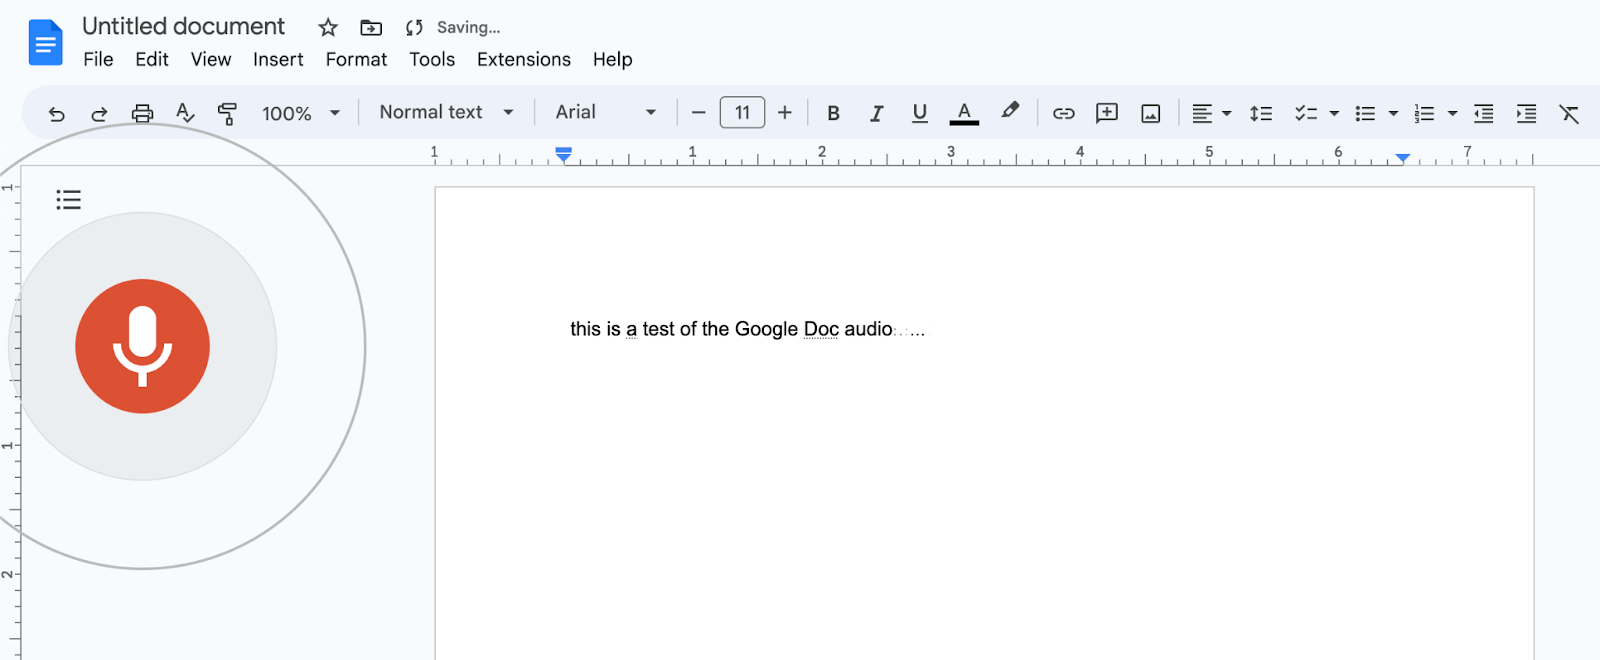
Step 6: Play Your Audio File and Start Transcribing
With your settings in place, hit the "play" button on your audio file and click the microphone icon in Google Docs. As the audio plays, watch the spoken words transform into text on your document in real time. It's like witnessing a live performance of speech-to-text artistry!
Step 7: Proofread and Edit Your Transcription
Once the transcription is complete, it's time to proofread and edit the text. Keep an eye out for any inaccuracies or misinterpretations by the speech recognition software. Give your transcript a thorough review, and voilà! You've successfully transcribed audio using Google Docs.
Now you know how to use Google Docs for audio transcription, but remember, there are even better alternatives out there to help you create high-quality, accurate transcripts.
Tips for Transcribing Effectively With Google Docs
Now that you've mastered the art of transcribing audio with Google Docs, let's enhance your skills with a few tips to transcribe even more effectively!
- Optimize your audio quality: Clear and high-quality audio is crucial for accurate transcription. Make sure to minimize background noise and ensure the speaker's voice is loud and clear. This will help Google's speech recognition software produce better results.
- Use headphones: Wearing headphones while playing the audio file can prevent any feedback loops between the microphone and speakers. This will ensure a cleaner transcription process.
- Speak punctuation aloud: If you're using Google Docs Voice Typing for dictation, remember to speak punctuation marks aloud, such as "comma," "period," or "question mark." This will help create a well-structured and easy-to-read transcript.
- Utilize voice commands: Google Docs supports a variety of voice commands, like "new line" or "delete," to help you format and edit your text hands-free. Familiarize yourself with these commands to speed up the editing process.
- Take breaks: If you're transcribing a long audio file, it's essential to take breaks. Pausing the audio and giving yourself a breather can help maintain focus and improve the overall quality of your transcription.
- Save your work: Don't forget to save your progress frequently. While Google Docs automatically saves your work, it's always a good idea to double-check and make sure your transcription is safely stored.
- Edit and proofread: Once the transcription is complete, invest some time in carefully proofreading and editing the text. This will ensure that your final transcript is polished, accurate, and professional.
Armed with these valuable tips, you're all set to conquer the world of transcription with Google Docs. Keep practicing and refining your skills, and soon you'll be a transcription superstar!
Consider Services Like Simon Says for Faster and more Convenient Transcription
While Google Docs Voice Typing is a useful tool for basic transcription needs, services like Simon Says take the game to a whole new level. Offering more convenient, faster, and accurate transcription capabilities, Simon Says, and similar services, are perfect for professionals who require top-notch results with minimal fuss.
Firstly, Simon Says is designed specifically for transcription, making it a dedicated and specialized service. It integrates seamlessly with popular programs like Adobe Premiere Pro, Final Cut, and DaVinci Resolve, enabling you to transcribe your audio and video files directly within your favorite editing software. This not only saves time but also streamlines your workflow, allowing you to focus on the creative aspects of your project.
Moreover, Simon Says boasts advanced speech recognition technology that outshines the capabilities of Google Docs Voice Typing. This powerful transcription engine delivers higher accuracy rates, even with challenging audio conditions such as background noise, multiple speakers, or accents. The resulting transcripts require less editing, freeing up your valuable time for other tasks.
Another advantage of Simon Says is its ability to handle various file formats and languages, making it an incredibly versatile transcription solution. Whether you're working on a multilingual project or dealing with non-standard file types, Simon Says has got you covered.
Simon Says also comes with additional features like automatic timestamps, speaker identification, and export options tailored to your specific requirements. These features are particularly useful for professionals working in industries like filmmaking, podcasting, or journalism, where precise timing and speaker identification are crucial.
Lastly, Simon Says offers excellent customer support and resources to help you make the most of your transcription experience. From tutorials and guides to responsive assistance, you'll always have access to the help you need.
How to Transcribe Audio With Simon Says
Now that we've discussed the benefits of using Simon Says, let's explore the step-by-step process of transcribing audio with this fantastic service. Buckle up and get ready for a seamless transcription experience!
Step 1: Sign Up for Simon Says
Visit the Simon Says website and sign up for an account. Choose the plan that best suits your needs, whether it's a one-time project or a subscription for ongoing transcription work.
Step 2: Upload Your Audio or Video File
Once you've created your account and logged in, click the "New Project" button. Upload your audio or video file by dragging and dropping it into the designated area or by browsing your computer to locate the file.
Step 3: Choose Your Language and Transcription Settings
Select the language of the audio you're transcribing and configure any additional settings, such as timestamps or speaker identification. These options will help tailor the transcription to your specific requirements.
Step 4: Start the Transcription Process
Click "Transcribe" to initiate the transcription process. Simon Says will work its magic, swiftly and accurately converting your audio or video file into text. Grab a snack and relax while Simon Says does the heavy lifting!
Step 5: Review and Edit Your Transcript
Once the transcription is complete, Simon Says will notify you. Review the transcript within the user-friendly editor, make any necessary edits, and utilize the built-in tools to perfect your text.
Step 6: Export Your Transcript
When you're satisfied with your transcript, click the "Export" button to download your text in the desired format. Simon Says supports various export options, including Microsoft Word, plain text, and subtitle formats like SRT and VTT.
Step 7: Integrate Simon Says With Your Favorite Editing Software (Optional)
If you're using Adobe Premiere Pro, Final Cut, or DaVinci Resolve, you can take advantage of Simon Says' seamless integration with these programs. Install the Simon Says extension or plugin for your editing software and import your transcript directly into your project timeline for a smooth, efficient workflow.
And there you have it! With these simple steps, you've successfully transcribed your audio or video file using Simon Says. Enjoy the convenience, speed, and accuracy that this powerful transcription service has to offer!
Bottom Line
Both Google Docs Voice Typing and Simon Says offer transcription solutions, but they cater to different needs and provide varying levels of accuracy and convenience.
Google Docs Voice Typing is a free and basic transcription tool integrated into the Google Docs ecosystem. It's ideal for casual users who need to transcribe small amounts of audio, like personal notes or simple conversations. While it's easy to use and accessible through the Chrome browser, it falls short when it comes to handling complex audio files, multiple speakers, or professional applications.
On the other hand, Simon Says is a powerful, dedicated transcription service designed to deliver high-quality, accurate transcripts for professionals working in industries like filmmaking, podcasting, and journalism. It integrates seamlessly with popular editing software and provides advanced features such as speaker identification, timestamps, and support for multiple languages and file formats. Although it comes at a cost, the investment is worthwhile for those who require top-notch results, speed, and convenience.
Ultimately, the choice between Google Docs Voice Typing and Simon Says depends on your specific needs, budget, and desired level of accuracy. While Google Docs is suitable for light transcription tasks, Simon Says stands out as the go-to solution for professionals seeking a comprehensive and efficient transcription experience. Evaluate your transcription requirements, and choose the service that best aligns with your needs, priorities, and budget. With the right transcription tool in your arsenal, you'll be unstoppable in sharing your audio and video content with the world!